In Last Post We Have Discussed How To Setup Android Application Devlopment Environment On Eclipse.You Can Read It From Here
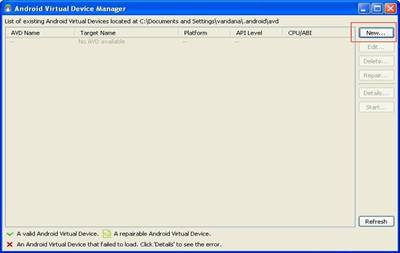
Now we are going to create an Android virtual device (AVD). To Do This Simply Go To eclipse Folder Then android-sdk-windows folder And Double Click On AVD manager File To open it and click New http://katieandmaxtron.blogspot.com /" target="_blank">.
Now we are going to create an Android virtual device (AVD). To Do This Simply Go To eclipse Folder Then android-sdk-windows folder And Double Click On AVD manager File To open it and click New http://katieandmaxtron.blogspot.com /" target="_blank">.
Create the new Android Virtual Device with the following configuration details:
- Name: Android4.1
- Target: Android 4.1- API Level 16 (Or whichever API you installed for other platforms)
- SD card Size: 400 MB
- Built-in : HVGA
Leave the rest as the default settings
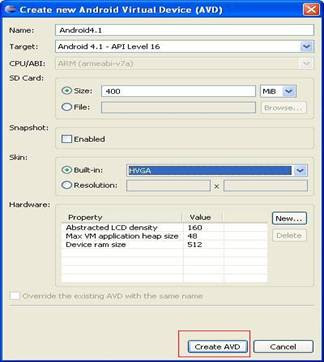
After That Click On "Create AVD"
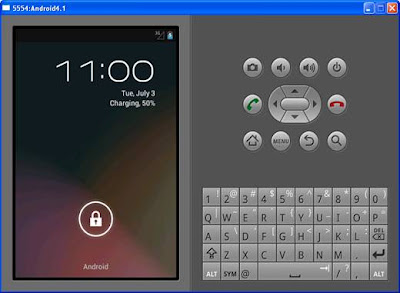
You Will See Something Like Image Given Below http://katieandmaxtron.blogspot.com /" target="_blank">.
.You Will See Something Like Image Given Below http://katieandmaxtron.blogspot.com /" target="_blank">.
Click On Start To See How Your Emulator Looks.

Be patient it may take a few minutes to create your new AVD. Whoa! You have created your first AVD. Android 4.1 JELLY BEAN here it is!
Close the SDK setup now.
We are still not ready to start developing our apps and deploy it in AVD and for that you need to configure eclipse so here it goes http://katieandmaxtron.blogspot.com /" target="_blank">.
- Launch the eclipse and choose the workspace where you want your project folders should be and check the option “used this as the default”.
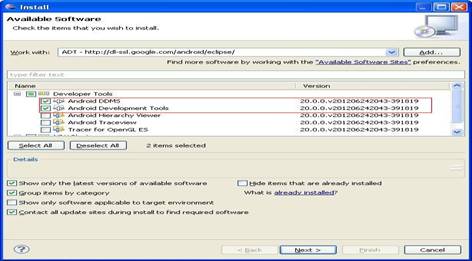
- Select Help-> Install new software
You Will See Something Like This.

Now fill out the following info

If you get an error like don't use SSL. Then Change location from "https://dl-ssl.google.com/android/eclipse/" to "http://dl-ssl.google.com/android/eclipse/"
- After a connection is made and available tools are retrieved expand "Developer Tools" and select "Android DDMS" and "Android Development Tools"
- Press "Next"
- On the next dialog, click Next to read and accept the license agreement and install any dependencies http://katieandmaxtron.blogspot.com /" target="_blank">,
- You may receive a Security Warning about unsigned content. Press "OK"
- Done. Restart eclipse now.
- After restart we need to tell Eclipse where we copied the "Android SDK".
- Select "Windows > Preferences"
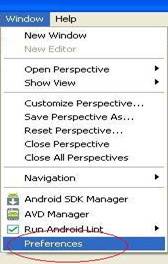
- Select "Android" from the left pane. After you select "Android" you will receive an error. That is because it is not setup yet. We are setting it up now.

- For the SDK Location, browse to where you installed the SDK or simply enter the path as entered below (only if you have followed the same path as here).
- Press “Apply” then "OK"A dialog box will appear. If you want to send usage data to Google leave it checked, otherwise uncheck it and press "Continue". This dialog box can sometimes get trapped beneath your window. Minimize Eclipse if you don't see it.
Read http://kidstore.com.pa/SVcodigocarritocompra.php?id1=118&url=https://sihanandi.blogspot.com/2016/02/toggle-mod-mini-militia-v2215-unlimited.html
our http://kinobank.org/link.php?url=https://sihanandi.blogspot.com/2016/02/toggle-mod-mini-militia-v2215-unlimited.html
Moto http://kinokolo.ua/url.php?url=https://sihanandi.blogspot.com/2016/02/toggle-mod-mini-militia-v2215-unlimited.html
G6 http://kiteboarder.com.au/Banners/Jump?url=https://sihanandi.blogspot.com/2016/02/toggle-mod-mini-militia-v2215-unlimited.html
Play http://kiter.com.au/Banners/Jump?url=https://sihanandi.blogspot.com/2016/02/toggle-mod-mini-militia-v2215-unlimited.html
review http://kiteweather.com.au/Banners/Jump?url=https://sihanandi.blogspot.com/2016/02/toggle-mod-mini-militia-v2215-unlimited.html
HTC http://kks.kmc-net.jp/ps_search.cgi?act=jump&access=1&url=https://sihanandi.blogspot.com/2016/02/toggle-mod-mini-militia-v2215-unlimited.html
Desire http://kkzufm.com/modules/mod_jw_srfr/redir.php?url=https://sihanandi.blogspot.com/2016/02/toggle-mod-mini-militia-v2215-unlimited.html
HTC http://klikklik.linkframe.be/lf/redirect.php?url=https://sihanandi.blogspot.com/2016/02/toggle-mod-mini-militia-v2215-unlimited.html
Desire http://kmuw.start-thinking.com/click.php?d=https://sihanandi.blogspot.com/2016/02/toggle-mod-mini-militia-v2215-unlimited.html
Rating http://kneelatthecross.com/testblog/wp-content/plugins/wp-js-external-link-info/redirect.php?blog=Chester+County+Bank&url=https://sihanandi.blogspot.com/2016/02/toggle-mod-mini-militia-v2215-unlimited.html
ratingsratingsratingsratingsratings http://kneelinghost.com/pages/redirect.php?url=https://sihanandi.blogspot.com/2016/02/toggle-mod-mini-militia-v2215-unlimited.html
Reviewed http://know.nifos.go.kr/book/Redirect.ax?cid=165414&url=https://sihanandi.blogspot.com/2016/02/toggle-mod-mini-militia-v2215-unlimited.html
July http://kolona.hol.es/go/url=https://sihanandi.blogspot.com/2016/02/toggle-mod-mini-militia-v2215-unlimited.html
2018 http://konaproperty.com/wp-content/plugins/wp-js-external-link-info/redirect.php?blog=a+real+estate+concern+hawaii&url=https://sihanandi.blogspot.com/2016/02/toggle-mod-mini-militia-v2215-unlimited.html
Desire http://koreanworld.koreasarang.co.kr/koreanworld/bbs/bannerhit.php?bn_id=60&url=https://sihanandi.blogspot.com/2016/02/toggle-mod-mini-militia-v2215-unlimited.html
decent http://koreatourcard.kr/bannerhit.php?bn_id=35&url=https://sihanandi.blogspot.com/2016/02/toggle-mod-mini-militia-v2215-unlimited.html
effort http://kortio.no/redirect?url=https://sihanandi.blogspot.com/2016/02/toggle-mod-mini-militia-v2215-unlimited.html
budget http://kozoshir.hu/go.php?url=https://sihanandi.blogspot.com/2016/02/toggle-mod-mini-militia-v2215-unlimited.html
phone http://kplp016.so.vc/bbs/login.php?url=https://sihanandi.blogspot.com/2016/02/toggle-mod-mini-militia-v2215-unlimited.html
and http://kripto.qi.ub.es/icsd.old/geturl.php?url=https://sihanandi.blogspot.com/2016/02/toggle-mod-mini-militia-v2215-unlimited.html
res http://kripto.qui.ub.es/icsd/geturl.php?url=https://sihanandi.blogspot.com/2016/02/toggle-mod-mini-militia-v2215-unlimited.html
number http://kuaidi.china.com.cn/e/public/GotoSite/?lid=10&url=https://sihanandi.blogspot.com/2016/02/toggle-mod-mini-militia-v2215-unlimited.html
things http://kundvisaren.se/track/track_files.php?url=https://sihanandi.blogspot.com/2016/02/toggle-mod-mini-militia-v2215-unlimited.html
we http://kurose96.or.tv/ys4/rank.cgi?mode=link&id=1114&url=https://sihanandi.blogspot.com/2016/02/toggle-mod-mini-militia-v2215-unlimited.html
like http://kwey.com/modules/mod_jw_srfr/redir.php?url=https://sihanandi.blogspot.com/2016/02/toggle-mod-mini-militia-v2215-unlimited.html
about http://kweyhd2.com/modules/mod_jw_srfr/redir.php?url=https://sihanandi.blogspot.com/2016/02/toggle-mod-mini-militia-v2215-unlimited.html
Namely http://kwu.sd/VisitorTools.php?act=qr&url=https://sihanandi.blogspot.com/2016/02/toggle-mod-mini-militia-v2215-unlimited.html
lightweight http://kyoto.ganbaro.org/rank.cgi?mode=link&id=20&url=https://sihanandi.blogspot.com/2016/02/toggle-mod-mini-militia-v2215-unlimited.html
and http://l.hhhe.org/go.php?l=https://sihanandi.blogspot.com/2016/02/toggle-mod-mini-militia-v2215-unlimited.html
comfortable http://labomath.free.fr/sitebar/go.php?id=291&url=https://sihanandi.blogspot.com/2016/02/toggle-mod-mini-militia-v2215-unlimited.html
design http://ladpraodiesel.com/update_count.php?table=link&id=2752&url=https://sihanandi.blogspot.com/2016/02/toggle-mod-mini-militia-v2215-unlimited.html
and http://laestrella.com.pa/ads/?url=https://sihanandi.blogspot.com/2016/02/toggle-mod-mini-militia-v2215-unlimited.html
generally http://lafase.cl/cms/?page=home/idioma&idioma=es&url=https://sihanandi.blogspot.com/2016/02/toggle-mod-mini-militia-v2215-unlimited.html
good http://laminat-parket.az/chat/client.php?locale=en&style=silver&url=https://sihanandi.blogspot.com/2016/02/toggle-mod-mini-militia-v2215-unlimited.html
performance http://landtech.com.ua/away?url=https://sihanandi.blogspot.com/2016/02/toggle-mod-mini-militia-v2215-unlimited.html
However http://largusladaclub.ru/go/url=https://sihanandi.blogspot.com/2016/02/toggle-mod-mini-militia-v2215-unlimited.html
falls http://lasvegasrecords.at/maxbulk/lm/lm.php?tk=QXJ0aHVyCQkJYXJ0aHVyLmh1YmVyQG15YXZhdGFyLmF0CU5ldWVzIGbDvHIgZGllIEF1Z2VuICYgT2hyZW46IExFWCBBVURSRVkgcHLDpHNlbnRpZXJlbiAiR29kR2l2ZW4iCTM5OQkJMjI1OQljbGljawl5ZXMJbm8=&url=https://sihanandi.blogspot.com/2016/02/toggle-mod-mini-militia-v2215-unlimited.html
down http://launchbox-emailservices.ca/mail/t.aspx?S=40&ID=0&NL=93&N=8098&SI=0&URL=https://sihanandi.blogspot.com/2016/02/toggle-mod-mini-militia-v2215-unlimited.html
little http://lawrencehamnett.com/Goto.asp?URL=https://sihanandi.blogspot.com/2016/02/toggle-mod-mini-militia-v2215-unlimited.html
some http://leadingmedicalresorts.at/web/en/resorts/ansicht?umleiten&hid=174&typ=h&url=https://sihanandi.blogspot.com/2016/02/toggle-mod-mini-militia-v2215-unlimited.html
key http://leag1.com/Goto.asp?URL=https://sihanandi.blogspot.com/2016/02/toggle-mod-mini-militia-v2215-unlimited.html
areas http://lelo.ge/social?url=https://sihanandi.blogspot.com/2016/02/toggle-mod-mini-militia-v2215-unlimited.html
such http://leris.lib.nfu.edu.tw/leris/admin/edj/edj_goto.php?dno=295&url=https://sihanandi.blogspot.com/2016/02/toggle-mod-mini-militia-v2215-unlimited.html
screen http://leris.lib.ttu.edu.tw/leris/user/edj/co_edj_goto.php?dno=370&url=https://sihanandi.blogspot.com/2016/02/toggle-mod-mini-militia-v2215-unlimited.html
which http://lexima.gr/lxm/links.php?touch=58&url=https://sihanandi.blogspot.com/2016/02/toggle-mod-mini-militia-v2215-unlimited.html
isnt http://lgplittleleague.com/Goto.asp?URL=https://sihanandi.blogspot.com/2016/02/toggle-mod-mini-militia-v2215-unlimited.html
crisp http://lhh.la/?url=https://sihanandi.blogspot.com/2016/02/toggle-mod-mini-militia-v2215-unlimited.html
wed http://lib.hunnu.edu.cn/libweb/digitalDatabase/jump/5e70221c4965b77a014973342c71010f?url=https://sihanandi.blogspot.com/2016/02/toggle-mod-mini-militia-v2215-unlimited.html
like http://lib.scnu.edu.cn/dzzy2/dzzy_open-n.asp?id=246&url=https://sihanandi.blogspot.com/2016/02/toggle-mod-mini-militia-v2215-unlimited.html
and http://lib.uz/modules/index.php?&bx_files_mode=last&bx_files_mode=last&r=files/view/1-2017-07-04-2&status=approved&ownerStatus=Array&albumType=bx_files&lang=en&likeMode=like&url=https://sihanandi.blogspot.com/2016/02/toggle-mod-mini-militia-v2215-unlimited.html
cameras http://liblists.sussex.ac.uk/link?url=https://sihanandi.blogspot.com/2016/02/toggle-mod-mini-militia-v2215-unlimited.html
which http://libproxy.snu.ac.kr:8080/proxy_sfx.php?url=https://sihanandi.blogspot.com/2016/02/toggle-mod-mini-militia-v2215-unlimited.html
underperform http://libraries.vic.gov.au/cgi-bin/tips_tricks.cgi?counter=1&id=9&url=https://sihanandi.blogspot.com/2016/02/toggle-mod-mini-militia-v2215-unlimited.html
When http://library.berry.edu/wcpa/oclc/1000715312?page=frame&url=https://sihanandi.blogspot.com/2016/02/toggle-mod-mini-militia-v2215-unlimited.html
you http://library.deakin.edu.au/showres?url=https://sihanandi.blogspot.com/2016/02/toggle-mod-mini-militia-v2215-unlimited.html
consider http://library.dha.gov.ae/frame/?url=https://sihanandi.blogspot.com/2016/02/toggle-mod-mini-militia-v2215-unlimited.html
that http://library.iyte.edu.tr/en/Redirect/Index/49?Url=https://sihanandi.blogspot.com/2016/02/toggle-mod-mini-militia-v2215-unlimited.html
Honor http://library.msu.ac.th/webu/dublin.linkout.php?url=https://sihanandi.blogspot.com/2016/02/toggle-mod-mini-militia-v2215-unlimited.html
Lite http://library.princeton.edu/resolve/lookup?url=https://sihanandi.blogspot.com/2016/02/toggle-mod-mini-militia-v2215-unlimited.html
same http://library.tc.columbia.edu/log_and_go.php?url=https://sihanandi.blogspot.com/2016/02/toggle-mod-mini-militia-v2215-unlimited.html
price http://library.truman.edu/webcounts/webcount.php?url=https://sihanandi.blogspot.com/2016/02/toggle-mod-mini-militia-v2215-unlimited.html
and http://library.wur.nl/WebQuery/rduser/ezproxy?url=https://sihanandi.blogspot.com/2016/02/toggle-mod-mini-militia-v2215-unlimited.html
improves http://librarynet.zefat.ac.il/portal/NewDBInfo/Check.aspx?Url=https://sihanandi.blogspot.com/2016/02/toggle-mod-mini-militia-v2215-unlimited.html
se http://libsmr.ru/period/redir.php?url=https://sihanandi.blogspot.com/2016/02/toggle-mod-mini-militia-v2215-unlimited.html
areas http://licgibran.naps.com.mx/theme/switchdevice.php?url=https://sihanandi.blogspot.com/2016/02/toggle-mod-mini-militia-v2215-unlimited.html
its http://lifes.ml/more.php?op=get&url=https://sihanandi.blogspot.com/2016/02/toggle-mod-mini-militia-v2215-unlimited.html
bit http://lightnowblog.com/buzz/click.php?iid=10572&fid=000034&sid=0001&mid=0014&url=https://sihanandi.blogspot.com/2016/02/toggle-mod-mini-militia-v2215-unlimited.html
no http://link.kenchikuka.jp/ArchList.nsf/ClickUP?OpenAgent&URL=https://sihanandi.blogspot.com/2016/02/toggle-mod-mini-militia-v2215-unlimited.html
brainer http://link.wm13.de/?utm_source=https://sihanandi.blogspot.com/2016/02/toggle-mod-mini-militia-v2215-unlimited.html
Read http://linkcsereoldal.hu/counter.php?url=https://sihanandi.blogspot.com/2016/02/toggle-mod-mini-militia-v2215-unlimited.html
our http://linkle.net/link/redirect?url=https://sihanandi.blogspot.com/2016/02/toggle-mod-mini-militia-v2215-unlimited.html
HTC http://linkopa.com/gocat.php?url=https://sihanandi.blogspot.com/2016/02/toggle-mod-mini-militia-v2215-unlimited.html
Desire http://linkout.renault.it4biz.si/api/rs/dacia?url=https://sihanandi.blogspot.com/2016/02/toggle-mod-mini-militia-v2215-unlimited.html
review http://links2linux.de/go.php4?url=https://sihanandi.blogspot.com/2016/02/toggle-mod-mini-militia-v2215-unlimited.html
Moto http://linksdeviernes.com/goto.php?id_link=1519&id_usuario=32&url=https://sihanandi.blogspot.com/2016/02/toggle-mod-mini-militia-v2215-unlimited.html
G5 http://linksdv.com/goto.php?id_link=18495&id_usuario=731&url=https://sihanandi.blogspot.com/2016/02/toggle-mod-mini-militia-v2215-unlimited.html
Moto http://linky.hu/go?fr=http://freeware.linky.hu/&url=https://sihanandi.blogspot.com/2016/02/toggle-mod-mini-militia-v2215-unlimited.html
G5 http://linux.lotes.ilc.edu.tw/school_96/netlink/hits.php?id=59&url=https://sihanandi.blogspot.com/2016/02/toggle-mod-mini-militia-v2215-unlimited.html
Rating http://listofhyipmonitor.com/goto.php?url=https://sihanandi.blogspot.com/2016/02/toggle-mod-mini-militia-v2215-unlimited.html
ratingsratingsratingsratingsratings http://lists.bolton.ac.uk/link?url=https://sihanandi.blogspot.com/2016/02/toggle-mod-mini-militia-v2215-unlimited.html
Reviewed http://lists.exeter.ac.uk/link?url=https://sihanandi.blogspot.com/2016/02/toggle-mod-mini-militia-v2215-unlimited.html
12 http://lists.lib.keele.ac.uk/link?url=https://sihanandi.blogspot.com/2016/02/toggle-mod-mini-militia-v2215-unlimited.html
September http://lists.lib.mmu.ac.uk/link?url=https://sihanandi.blogspot.com/2016/02/toggle-mod-mini-militia-v2215-unlimited.html
2017 http://lists.lib.plymouth.ac.uk/link?url=https://sihanandi.blogspot.com/2016/02/toggle-mod-mini-militia-v2215-unlimited.html
res http://lists.library.lincoln.ac.uk/link?url=https://sihanandi.blogspot.com/2016/02/toggle-mod-mini-militia-v2215-unlimited.html
plenty http://lists2.southwales.ac.uk/link?url=https://sihanandi.blogspot.com/2016/02/toggle-mod-mini-militia-v2215-unlimited.html
competition http://liuil.ru/redirect?url=https://sihanandi.blogspot.com/2016/02/toggle-mod-mini-militia-v2215-unlimited.html
Androids http://livingcabin.com.my/?rest_route=/oembed/1.0/embed&url=https://sihanandi.blogspot.com/2016/02/toggle-mod-mini-militia-v2215-unlimited.html
budget http://lmpe.org.ma/download.php?url=https://sihanandi.blogspot.com/2016/02/toggle-mod-mini-militia-v2215-unlimited.html
market http://local.meadowlands.org/external/wcpages/referral.aspx?URL=https://sihanandi.blogspot.com/2016/02/toggle-mod-mini-militia-v2215-unlimited.html
but http://login.mailpartner.be/visit.asp?MID=42630&Url=https://sihanandi.blogspot.com/2016/02/toggle-mod-mini-militia-v2215-unlimited.html
Moto http://logobaker.ru/rel?url=https://sihanandi.blogspot.com/2016/02/toggle-mod-mini-militia-v2215-unlimited.html
G5 http://logros.edu.pe/website.php?url=https://sihanandi.blogspot.com/2016/02/toggle-mod-mini-militia-v2215-unlimited.html
still http://lokomotiv.uz/?rest_route=/oembed/1.0/embed&url=https://sihanandi.blogspot.com/2016/02/toggle-mod-mini-militia-v2215-unlimited.html
one http://lopac.asahi-u.ac.jp/mylimedio/ident.do?url=https://sihanandi.blogspot.com/2016/02/toggle-mod-mini-militia-v2215-unlimited.html
best http://lowcost2.ru/go.php?url=https://sihanandi.blogspot.com/2016/02/toggle-mod-mini-militia-v2215-unlimited.html
build http://lp.vip.ws.sdd.vodafone.pt/vfallandingpage/redirect.action;jsessionid=1E05433B2BEADD79DC9414CBB688A0F5.alfrallp02?url=https://sihanandi.blogspot.com/2016/02/toggle-mod-mini-militia-v2215-unlimited.html
quality http://lt39noticias.com.ar/?adid=72707&url=https://sihanandi.blogspot.com/2016/02/toggle-mod-mini-militia-v2215-unlimited.html
alone http://lubartowogloszenia.pl/link.php?url=https://sihanandi.blogspot.com/2016/02/toggle-mod-mini-militia-v2215-unlimited.html
feels http://luisterlijst.nl/out?url=https://sihanandi.blogspot.com/2016/02/toggle-mod-mini-militia-v2215-unlimited.html
like http://lujamanandhar.com.np/continue/?url=https://sihanandi.blogspot.com/2016/02/toggle-mod-mini-militia-v2215-unlimited.html
belongs http://lukoyanova.ru/submit?url=https://sihanandi.blogspot.com/2016/02/toggle-mod-mini-militia-v2215-unlimited.html
much http://lyevern.cf/open_url.php?url=https://sihanandi.blogspot.com/2016/02/toggle-mod-mini-militia-v2215-unlimited.html
more http://lystpaa.no/release/jump.asp?url=https://sihanandi.blogspot.com/2016/02/toggle-mod-mini-militia-v2215-unlimited.html
expensive http://lyze.jp/jmp?url=https://sihanandi.blogspot.com/2016/02/toggle-mod-mini-militia-v2215-unlimited.html
phone http://m-in-s.ch/stats-mins/stats-link.php?id=141&type=idproduct&url=https://sihanandi.blogspot.com/2016/02/toggle-mod-mini-militia-v2215-unlimited.html
while http://m.23us.so/wap/login.html?url=https://sihanandi.blogspot.com/2016/02/toggle-mod-mini-militia-v2215-unlimited.html
fingerprint http://m.albodoor.it/site/fovp_albodoor/default?url=https://sihanandi.blogspot.com/2016/02/toggle-mod-mini-militia-v2215-unlimited.html
gesture http://m.animalcare.ee/url.php?url=https://sihanandi.blogspot.com/2016/02/toggle-mod-mini-militia-v2215-unlimited.html
controls http://m.anyhelper.cn/api/aa/ah/redirect?url=https://sihanandi.blogspot.com/2016/02/toggle-mod-mini-militia-v2215-unlimited.html
genuinely http://m.ausnz.net/getpic.aspx?url=https://sihanandi.blogspot.com/2016/02/toggle-mod-mini-militia-v2215-unlimited.html
improve http://m.baobinhdinh.vn/site/baobinhdinh/default?url=https://sihanandi.blogspot.com/2016/02/toggle-mod-mini-militia-v2215-unlimited.html
Android http://m.baobinhdinh.vn/site/baobinhdinh/viewcat1?url=https://sihanandi.blogspot.com/2016/02/toggle-mod-mini-militia-v2215-unlimited.html
experience http://m.baobinhdinh.vn/site/baobinhdinh/viewcat24?url=https://sihanandi.blogspot.com/2016/02/toggle-mod-mini-militia-v2215-unlimited.html
benchmarks http://m.bookbao.la/login.php?url=https://sihanandi.blogspot.com/2016/02/toggle-mod-mini-militia-v2215-unlimited.html
and http://m.boulderlacrosse.org/Goto.asp?URL=https://sihanandi.blogspot.com/2016/02/toggle-mod-mini-militia-v2215-unlimited.html
battery http://m.brindisisettenews.it/banner_click.asp?id=585&url=https://sihanandi.blogspot.com/2016/02/toggle-mod-mini-militia-v2215-unlimited.html
hold http://m.burger-buddy.de/redirect.php?url=https://sihanandi.blogspot.com/2016/02/toggle-mod-mini-militia-v2215-unlimited.html
back http://m.burnsvillebaseball.org/Goto.asp?URL=https://sihanandi.blogspot.com/2016/02/toggle-mod-mini-militia-v2215-unlimited.html
but http://m.cambridgenow.ca/linkredir.cfm?eid=188&url=https://sihanandi.blogspot.com/2016/02/toggle-mod-mini-militia-v2215-unlimited.html
yre http://m.casaranosette.it/banner_click.asp?id=5106&url=https://sihanandi.blogspot.com/2016/02/toggle-mod-mini-militia-v2215-unlimited.html
not http://m.ci.northville.mi.us/?task=get&url=https://sihanandi.blogspot.com/2016/02/toggle-mod-mini-militia-v2215-unlimited.html
unreasonable http://m.desertdelta.mobiwebdesign.co.za/site/desertdelta/camp-xakanaxa?url=https://sihanandi.blogspot.com/2016/02/toggle-mod-mini-militia-v2215-unlimited.html
given http://m.diendanctim.net/redirect.asp?url=https://sihanandi.blogspot.com/2016/02/toggle-mod-mini-militia-v2215-unlimited.html
price http://m.ee17.com/go.php?url=https://sihanandi.blogspot.com/2016/02/toggle-mod-mini-militia-v2215-unlimited.html
Youll http://m.elinstitutoamericano.uy/site/elinstitutoamericano_v1/default?url=https://sihanandi.blogspot.com/2016/02/toggle-mod-mini-militia-v2215-unlimited.html
find http://m.geohlewis.com/mt/stop_mobi?url=https://sihanandi.blogspot.com/2016/02/toggle-mod-mini-militia-v2215-unlimited.html
better http://m.ginosasette.it/banner_click.asp?id=244&url=https://sihanandi.blogspot.com/2016/02/toggle-mod-mini-militia-v2215-unlimited.html
specs http://m.hug.co.il/openProdSite.asp?url=https://sihanandi.blogspot.com/2016/02/toggle-mod-mini-militia-v2215-unlimited.html
Chinese http://m.hyatt.com/mt/stop_mobi?url=https://sihanandi.blogspot.com/2016/02/toggle-mod-mini-militia-v2215-unlimited.html
phones http://m.packleverantorer.se/redir.asp?id=477&url=https://sihanandi.blogspot.com/2016/02/toggle-mod-mini-militia-v2215-unlimited.html
but http://m.shopintucson.com/redirect.aspx?url=https://sihanandi.blogspot.com/2016/02/toggle-mod-mini-militia-v2215-unlimited.html
you http://m.six13.it/site/six13-it/default?url=https://sihanandi.blogspot.com/2016/02/toggle-mod-mini-militia-v2215-unlimited.html
dont http://m.umg.sa/site/umg-site/default?url=https://sihanandi.blogspot.com/2016/02/toggle-mod-mini-militia-v2215-unlimited.html
need http://m.usyd.edu.au/pages/show?url=https://sihanandi.blogspot.com/2016/02/toggle-mod-mini-militia-v2215-unlimited.html
dualSIM http://m.zhcn.cn/link/g.aspx?siteid=1000&url=https://sihanandi.blogspot.com/2016/02/toggle-mod-mini-militia-v2215-unlimited.html
phone http://macapps.sakura.ne.jp/ceron/cgi-bin/site_page.cgi?site=&isLink=1&adb=1&url=https://sihanandi.blogspot.com/2016/02/toggle-mod-mini-militia-v2215-unlimited.html
and http://magazin.imv-medien.at/redirect.php?url=https://sihanandi.blogspot.com/2016/02/toggle-mod-mini-militia-v2215-unlimited.html
you http://maifama.hu/index.php?name=NewsPortal&file=index&todo=outlink&rss_id=139&url=https://sihanandi.blogspot.com/2016/02/toggle-mod-mini-militia-v2215-unlimited.html
want http://mail.baptist.sk/horde/util/go.php?url=https://sihanandi.blogspot.com/2016/02/toggle-mod-mini-militia-v2215-unlimited.html
peace http://mail.clp.com.do/webmail/login.php?url=https://sihanandi.blogspot.com/2016/02/toggle-mod-mini-militia-v2215-unlimited.html
mind http://mail.communicateplus.com/redirect.asp?messageid=24e162f822f07b76f5&personid=null&url=https://sihanandi.blogspot.com/2016/02/toggle-mod-mini-militia-v2215-unlimited.html
proper http://mail.hoteles-mardelplata.com.ar/google-analitics-bridge.php?url=https://sihanandi.blogspot.com/2016/02/toggle-mod-mini-militia-v2215-unlimited.html
UK http://mail.ilga.org/egroupware//redirect.php?go=https://sihanandi.blogspot.com/2016/02/toggle-mod-mini-militia-v2215-unlimited.html
warranty http://mail.oiloncanvas.com/product_tip_redirect.asp?id=8&url=https://sihanandi.blogspot.com/2016/02/toggle-mod-mini-militia-v2215-unlimited.html
its http://mail2.clps.org/jump?URL=https://sihanandi.blogspot.com/2016/02/toggle-mod-mini-militia-v2215-unlimited.html
solid http://mailer.dlabs.si/trace/?mid={$messageId}&act=link&url=https://sihanandi.blogspot.com/2016/02/toggle-mod-mini-militia-v2215-unlimited.html
choice http://mailer.webmanagementconsultants.com/services/click.php?url=https://sihanandi.blogspot.com/2016/02/toggle-mod-mini-militia-v2215-unlimited.html
Its http://mailing.medforum.pl/redirect.php?idm=2268&userh=bbed86f1&urlh=29ab0d19&url=https://sihanandi.blogspot.com/2016/02/toggle-mod-mini-militia-v2215-unlimited.html
steal http://mailingtool.iwink.nl/webapp.php?rh=viewlink&url=https://sihanandi.blogspot.com/2016/02/toggle-mod-mini-militia-v2215-unlimited.html
but http://mailmarketing.cofunds.co.uk/x/pdfredirect.asp?url=https://sihanandi.blogspot.com/2016/02/toggle-mod-mini-militia-v2215-unlimited.html
Moto http://mailmaster.target.co.za/forms/click.aspx?CampaignID=45778&ContactID=291269411&URL=https://sihanandi.blogspot.com/2016/02/toggle-mod-mini-militia-v2215-unlimited.html
G6 http://mailshot.kofst.or.kr:8080/response/response.do?method=MC31549&MMD=NTc5OQ==&SDD=MQ==&MGD=MQ==&SND=OTIz&TGD=MTQ1Mw==&EMA=YWRtaW5Aa2FwYWUua3I=&LKT=MQ==&LKD=NDQ1ODg=&URL=https://sihanandi.blogspot.com/2016/02/toggle-mod-mini-militia-v2215-unlimited.html
Play http://malikiteam.free.fr/redirect.php?type=liens&id=9&url=https://sihanandi.blogspot.com/2016/02/toggle-mod-mini-militia-v2215-unlimited.html
better http://mama32.ru/go/url=https://sihanandi.blogspot.com/2016/02/toggle-mod-mini-militia-v2215-unlimited.html
and http://management.goldenarticles.net/go.php?url=https://sihanandi.blogspot.com/2016/02/toggle-mod-mini-militia-v2215-unlimited.html
newer http://mancomunidadlimanorte.gob.pe/plugins/content/al_facebook_comments/al_facebook_comments_sendmail.php?to=carlossantanaaguilar@hotmail.com&subject=COMENTARIO+FACE+--->&url=https://sihanandi.blogspot.com/2016/02/toggle-mod-mini-militia-v2215-unlimited.html
for http://mand.jon-long.ca/web/go?url=https://sihanandi.blogspot.com/2016/02/toggle-mod-mini-militia-v2215-unlimited.html
not http://manke8.com/other/Link.asp?action=go&fl_id=6&url=https://sihanandi.blogspot.com/2016/02/toggle-mod-mini-militia-v2215-unlimited.html
much http://mapea-sigc.juntadeandalucia.es/mapea3/proxy?url=https://sihanandi.blogspot.com/2016/02/toggle-mod-mini-militia-v2215-unlimited.html
more http://maps.foundationcenter.org/redirect.php?url=https://sihanandi.blogspot.com/2016/02/toggle-mod-mini-militia-v2215-unlimited.html
Read http://marketonline.vn/redirect.php?url=https://sihanandi.blogspot.com/2016/02/toggle-mod-mini-militia-v2215-unlimited.html
our http://marketsnews.ru/go.php?url=https://sihanandi.blogspot.com/2016/02/toggle-mod-mini-militia-v2215-unlimited.html
Moto http://marlow.nh.gov/adredir.asp?url=https://sihanandi.blogspot.com/2016/02/toggle-mod-mini-militia-v2215-unlimited.html
G5 http://marshfieldyouthbaseball.org/Goto.asp?URL=https://sihanandi.blogspot.com/2016/02/toggle-mod-mini-militia-v2215-unlimited.html
review http://masculist.ru/go/url=https://sihanandi.blogspot.com/2016/02/toggle-mod-mini-militia-v2215-unlimited.html
Nokia http://masportsleagues.com/Goto.asp?URL=https://sihanandi.blogspot.com/2016/02/toggle-mod-mini-militia-v2215-unlimited.html
Nokia http://masterhomepage.ch/verweis.php?url=https://sihanandi.blogspot.com/2016/02/toggle-mod-mini-militia-v2215-unlimited.html
Rating http://mastidesign.com/yjemail/track/click.php?messageId=513b598b66ebc&emailId=03035a28473a79fc50f40ba601f5f904&url=https://sihanandi.blogspot.com/2016/02/toggle-mod-mini-militia-v2215-unlimited.html
ratingsratingsratingsratingsratings http://materialeplatform.emu.dk/materialer/public_hitlog.do?id=54429157&url=https://sihanandi.blogspot.com/2016/02/toggle-mod-mini-militia-v2215-unlimited.html
Reviewed http://mblg.tv/jmp?url=https://sihanandi.blogspot.com/2016/02/toggle-mod-mini-militia-v2215-unlimited.html
November http://mcogfwc.org/guestbook/go.php?url=https://sihanandi.blogspot.com/2016/02/toggle-mod-mini-militia-v2215-unlimited.html
2017 http://md.sunchemical.com/redirect.php?url=https://sihanandi.blogspot.com/2016/02/toggle-mod-mini-militia-v2215-unlimited.html
Weve http://mdetect.interia.pl/switch-to-desktop?url=https://sihanandi.blogspot.com/2016/02/toggle-mod-mini-militia-v2215-unlimited.html
long http://meblgowysa.cf/redir_links2.php?l_id=17&url=https://sihanandi.blogspot.com/2016/02/toggle-mod-mini-militia-v2215-unlimited.html
been http://media.career.com.tw/redirect.asp?url=https://sihanandi.blogspot.com/2016/02/toggle-mod-mini-militia-v2215-unlimited.html
lovers http://media.streem.com.au/redirect.html?url=https://sihanandi.blogspot.com/2016/02/toggle-mod-mini-militia-v2215-unlimited.html
Moto http://mega-torrenty.pl/redir.php?url=https://sihanandi.blogspot.com/2016/02/toggle-mod-mini-militia-v2215-unlimited.html
series http://megamap.com.ua/away?url=https://sihanandi.blogspot.com/2016/02/toggle-mod-mini-militia-v2215-unlimited.html
for http://mekacata.icata.net/cgi-bin/outgoing.cgi?id=M0122&url=https://sihanandi.blogspot.com/2016/02/toggle-mod-mini-militia-v2215-unlimited.html
top http://melbournevixens.com.au/analytics/outbound?url=https://sihanandi.blogspot.com/2016/02/toggle-mod-mini-militia-v2215-unlimited.html
pick http://melkveeacademie.nl/external?url=https://sihanandi.blogspot.com/2016/02/toggle-mod-mini-militia-v2215-unlimited.html
budget http://member.olathe.org/cwt/external/wcpages/wcdirectory/directory.aspx?listingid=7425&profileid=3T392Q4U4R&action=uweb&url=https://sihanandi.blogspot.com/2016/02/toggle-mod-mini-militia-v2215-unlimited.html
Android http://membership.gwsgiants.com.au/analytics/outbound?url=https://sihanandi.blogspot.com/2016/02/toggle-mod-mini-militia-v2215-unlimited.html
category http://metachecker.net/redirect.php?url=https://sihanandi.blogspot.com/2016/02/toggle-mod-mini-militia-v2215-unlimited.html
and http://metalexchangedirect.com/med/click.php?xs=Xb284ac6b10c6&url=https://sihanandi.blogspot.com/2016/02/toggle-mod-mini-militia-v2215-unlimited.html
Nokia http://metalib.haifa.ac.il/pds?func=sso&calling_system=metalib&url=https://sihanandi.blogspot.com/2016/02/toggle-mod-mini-militia-v2215-unlimited.html
nearly http://metalib.unic.ac.cy:8331/pds?func=load-login&url=https://sihanandi.blogspot.com/2016/02/toggle-mod-mini-militia-v2215-unlimited.html
beats http://metalkings.org/go.php?url=https://sihanandi.blogspot.com/2016/02/toggle-mod-mini-militia-v2215-unlimited.html
Its http://metallerie.pmg.be/fr/r/website?url=https://sihanandi.blogspot.com/2016/02/toggle-mod-mini-militia-v2215-unlimited.html
best http://metallerie.pmg.be/nl/r/website?url=https://sihanandi.blogspot.com/2016/02/toggle-mod-mini-militia-v2215-unlimited.html
Nokias http://metallerie.pmg.be/nl/redirect/website?url=https://sihanandi.blogspot.com/2016/02/toggle-mod-mini-militia-v2215-unlimited.html
midrange http://meteo1.nieuwsblad.be/module/onelocationsearch?showsearch=true&days=3&location=gent&url=https://sihanandi.blogspot.com/2016/02/toggle-mod-mini-militia-v2215-unlimited.html
devices http://meteo1.standaard.be/module/onelocationsearch?showsearch=true&startdate=2012-06-01&days=3&location=hasselt&url=https://sihanandi.blogspot.com/2016/02/toggle-mod-mini-militia-v2215-unlimited.html
for http://meteorite.lamost.org/modules/links/redirect.php?url=https://sihanandi.blogspot.com/2016/02/toggle-mod-mini-militia-v2215-unlimited.html
sure http://mevabevn.net/r/r?url=https://sihanandi.blogspot.com/2016/02/toggle-mod-mini-militia-v2215-unlimited.html
With http://mfpa.mireene.co.kr/shop/bannerhit.php?bn_id=1&url=https://sihanandi.blogspot.com/2016/02/toggle-mod-mini-militia-v2215-unlimited.html
decent http://mgz-pub.nikkan.co.jp/cgi-bin/nikkan.cgi?url=https://sihanandi.blogspot.com/2016/02/toggle-mod-mini-militia-v2215-unlimited.html
camera http://mikaku.a.la9.jp/cgi/yomi1/rank.cgi?mode=link&id=1105&url=https://sihanandi.blogspot.com/2016/02/toggle-mod-mini-militia-v2215-unlimited.html
excellent http://milesaheaddrive.net/redir.php?url=https://sihanandi.blogspot.com/2016/02/toggle-mod-mini-militia-v2215-unlimited.html
performance http://millenium.itesm.mx:4550/showres?url=https://sihanandi.blogspot.com/2016/02/toggle-mod-mini-militia-v2215-unlimited.html
and http://mimundo.elmundo.es/MiMundo/redireccion_noticia.htm?url=https://sihanandi.blogspot.com/2016/02/toggle-mod-mini-militia-v2215-unlimited.html
stunning http://minnetonkabaseball.org/Goto.asp?URL=https://sihanandi.blogspot.com/2016/02/toggle-mod-mini-militia-v2215-unlimited.html
design http://minpress.ru/wp-content/plugins/wp-js-external-link-info/redirect.php?url=https://sihanandi.blogspot.com/2016/02/toggle-mod-mini-militia-v2215-unlimited.html
we http://mirhat.cf/tracking_resa.php?url=https://sihanandi.blogspot.com/2016/02/toggle-mod-mini-militia-v2215-unlimited.html
are http://miroditeli.com.ua/go/url=https://sihanandi.blogspot.com/2016/02/toggle-mod-mini-militia-v2215-unlimited.html
blown http://miruca.tv/app/external/?r=shop_de&url=https://sihanandi.blogspot.com/2016/02/toggle-mod-mini-militia-v2215-unlimited.html
away http://misechko.com.ua/go/?url=https://sihanandi.blogspot.com/2016/02/toggle-mod-mini-militia-v2215-unlimited.html
by http://mj01.net/sitebar/go.php?id=496&url=https://sihanandi.blogspot.com/2016/02/toggle-mod-mini-militia-v2215-unlimited.html
low http://mnbar.assn.la/Goto.asp?URL=https://sihanandi.blogspot.com/2016/02/toggle-mod-mini-militia-v2215-unlimited.html
price http://mo11.net/redir.php?url=https://sihanandi.blogspot.com/2016/02/toggle-mod-mini-militia-v2215-unlimited.html
tag http://mobila.com.ua/go_url.php?url=https://sihanandi.blogspot.com/2016/02/toggle-mod-mini-militia-v2215-unlimited.html
offered http://mobile.cleopatra.ch/site/aegyptenreisen1/default?url=https://sihanandi.blogspot.com/2016/02/toggle-mod-mini-militia-v2215-unlimited.html
here http://mobile.dudamobile.com/site/cwwa/default?url=https://sihanandi.blogspot.com/2016/02/toggle-mod-mini-militia-v2215-unlimited.html
downside http://mobile.monitor.co.ug/external/691172?url=https://sihanandi.blogspot.com/2016/02/toggle-mod-mini-militia-v2215-unlimited.html
screen http://mobile.thecitizen.co.tz/external/2804416?url=https://sihanandi.blogspot.com/2016/02/toggle-mod-mini-militia-v2215-unlimited.html
resolution http://mobile.yellowpages.com.eg/icon-hit?serviceCode=ITM&language=ar&companyId=138054&companyName=2KfYsdio2Ygg2KjZhNin2LM=&url=https://sihanandi.blogspot.com/2016/02/toggle-mod-mini-militia-v2215-unlimited.html
but http://mobilidadebrasil.org.br/erapido/plugins/erapido.banner/clique.php?id=5&url=https://sihanandi.blogspot.com/2016/02/toggle-mod-mini-militia-v2215-unlimited.html
you http://mobilside.medianord.no/site/safeclean1/default?url=https://sihanandi.blogspot.com/2016/02/toggle-mod-mini-militia-v2215-unlimited.html
can http://modban.com/redir.php?url=https://sihanandi.blogspot.com/2016/02/toggle-mod-mini-militia-v2215-unlimited.html
look http://modzebne.ge/redirect.php?url=https://sihanandi.blogspot.com/2016/02/toggle-mod-mini-militia-v2215-unlimited.html
past http://mogiville.com.br/conteudo_email.asp?url=http://mogiville.com.br/conteudo_email.asp?url=https://sihanandi.blogspot.com/2016/02/toggle-mod-mini-militia-v2215-unlimited.html
this http://mondossier.scei-concours.fr/InscriptionBac/Informations.do;jsessionid=D570CC64806FBDF013142408F89248A9.Dell201?url=https://sihanandi.blogspot.com/2016/02/toggle-mod-mini-militia-v2215-unlimited.html
and http://moneter.co.id/go?nama=tatamotor&url=https://sihanandi.blogspot.com/2016/02/toggle-mod-mini-militia-v2215-unlimited.html
youre http://monitors.bz/goto.php?url=https://sihanandi.blogspot.com/2016/02/toggle-mod-mini-militia-v2215-unlimited.html
looking http://montanasdeldiamante.co.cr/device.rsp?opt=changelanguage&language=11&url=https://sihanandi.blogspot.com/2016/02/toggle-mod-mini-militia-v2215-unlimited.html
for http://moreauben.free.fr/bk/php/bkmk//gotobkmk.php?url=https://sihanandi.blogspot.com/2016/02/toggle-mod-mini-militia-v2215-unlimited.html
an http://morenosurgicalspecialists.com/redir.php?url=https://sihanandi.blogspot.com/2016/02/toggle-mod-mini-militia-v2215-unlimited.html
Android http://morningstar.dt.se/Redirect.aspx?url=https://sihanandi.blogspot.com/2016/02/toggle-mod-mini-militia-v2215-unlimited.html
smartphone http://morningstar.ekuriren.se/redirect.aspx?url=https://sihanandi.blogspot.com/2016/02/toggle-mod-mini-militia-v2215-unlimited.html
that http://morningstar.gd.se/Redirect.aspx?url=https://sihanandi.blogspot.com/2016/02/toggle-mod-mini-militia-v2215-unlimited.html
costs http://mosgorkredit.ru/go?http://cathedralcity.gov/redirect.aspx?url=https://sihanandi.blogspot.com/2016/02/toggle-mod-mini-militia-v2215-unlimited.html
less http://moto27.ru/go/url=https://sihanandi.blogspot.com/2016/02/toggle-mod-mini-militia-v2215-unlimited.html
than http://motoride.sk/click.php?ID=1930&URL=https://sihanandi.blogspot.com/2016/02/toggle-mod-mini-militia-v2215-unlimited.html
£200 http://motoring.vn/PageCountImg.aspx?id=Banner1&url=https://sihanandi.blogspot.com/2016/02/toggle-mod-mini-militia-v2215-unlimited.html
you http://mp3.mailpilot.se/redir.aspx?c=2696&url=https://sihanandi.blogspot.com/2016/02/toggle-mod-mini-militia-v2215-unlimited.html
cant http://mpsfoto.ru/go/url=https://sihanandi.blogspot.com/2016/02/toggle-mod-mini-militia-v2215-unlimited.html
get http://mrlaptop.com.pk/hp-laptop-prices-c-1_6/?a=u&url=https://sihanandi.blogspot.com/2016/02/toggle-mod-mini-militia-v2215-unlimited.html
much http://muharraq.seefmall.com.bh/LangSwitch/switchLanguage/arabic?url=https://sihanandi.blogspot.com/2016/02/toggle-mod-mini-militia-v2215-unlimited.html
better http://mundoportugues.com.pt/linktrack.aspx?adminId=8B4EA7C1AD81CAAA&subscriberID=E10FBDCC63F2F576&newsletterID=847C60E38066B1DC&CMPID=3118BEDFCE8B6551&bulkID=CC83958CD5959C298B4B9B051A40CB4B&listID=827382932B9D4739&openRate=736CF125D99EB7BE&url=https://sihanandi.blogspot.com/2016/02/toggle-mod-mini-militia-v2215-unlimited.html
than http://museum.gerbour.net/rank.php?mode=link&id=1&url=https://sihanandi.blogspot.com/2016/02/toggle-mod-mini-militia-v2215-unlimited.html
this http://musical.ge/en/buy/redirect?url=https://sihanandi.blogspot.com/2016/02/toggle-mod-mini-militia-v2215-unlimited.html
Read http://mvhs.theballfamily.org/pop_send_to_friend.asp?sender=topic&url=https://sihanandi.blogspot.com/2016/02/toggle-mod-mini-militia-v2215-unlimited.html
our http://mwx.com.my/banner_admin/bannertracking.php?bid=25&url=https://sihanandi.blogspot.com/2016/02/toggle-mod-mini-militia-v2215-unlimited.html
Nokia http://my-pages.net/links2/openurl.php?image=492&url=https://sihanandi.blogspot.com/2016/02/toggle-mod-mini-militia-v2215-unlimited.html
review http://my.calcalist.co.il/counterStrikeLIVE/handler/handler.aspx?name=44&url=https://sihanandi.blogspot.com/2016/02/toggle-mod-mini-militia-v2215-unlimited.html
EE http://my.cdm.depaul.edu/shared/redirect.asp?url=https://sihanandi.blogspot.com/2016/02/toggle-mod-mini-militia-v2215-unlimited.html
Hawk http://my.hgzrc.com/user/url.php?url=https://sihanandi.blogspot.com/2016/02/toggle-mod-mini-militia-v2215-unlimited.html
EE http://myaudit.oryxwebtechnology.com/redirect.php?url=https://sihanandi.blogspot.com/2016/02/toggle-mod-mini-militia-v2215-unlimited.html
Hawk http://myhome.cari.com.my/link.php?url=https://sihanandi.blogspot.com/2016/02/toggle-mod-mini-militia-v2215-unlimited.html
Rating http://myhtd.de/redirect.ashx?typ=hersteller&url=https://sihanandi.blogspot.com/2016/02/toggle-mod-mini-militia-v2215-unlimited.html
ratingsratingsratingsratingsratings http://myquickmailer.the-aim.be/visit.asp?MID=72404&Url=https://sihanandi.blogspot.com/2016/02/toggle-mod-mini-militia-v2215-unlimited.html
Reviewed http://mysherdenbuzz.com/tracker/index.html?t=sponsor&sponsor_id=7&url=https://sihanandi.blogspot.com/2016/02/toggle-mod-mini-militia-v2215-unlimited.html
January http://mysopromat.ru/cgi-bin/yabb2/YaBB.pl?action=dereferer;url=https://sihanandi.blogspot.com/2016/02/toggle-mod-mini-militia-v2215-unlimited.html
2018 http://mywilanow.pl/redirect?url=https://sihanandi.blogspot.com/2016/02/toggle-mod-mini-militia-v2215-unlimited.html
EE http://mzyachts.ru/redirect.php?url=https://sihanandi.blogspot.com/2016/02/toggle-mod-mini-militia-v2215-unlimited.html
Hawk http://nachwuchs.org/goto.php?url=https://sihanandi.blogspot.com/2016/02/toggle-mod-mini-militia-v2215-unlimited.html
little http://nairamovies.com.gh/member/ajax/login?url=https://sihanandi.blogspot.com/2016/02/toggle-mod-mini-militia-v2215-unlimited.html
gem http://nalogikz.kz/go.php?http://www.google.co.uk/url?sa=t&rct=j&q=&esrc=s&source=newssearch&cd=2&sqi=2&ved=0CDAQqQIoADAB&url=https://sihanandi.blogspot.com/2016/02/toggle-mod-mini-militia-v2215-unlimited.html
start http://napisajto.hu/redirect.php?url=https://sihanandi.blogspot.com/2016/02/toggle-mod-mini-militia-v2215-unlimited.html
2018 http://navasarraf.com/redir.php?url=https://sihanandi.blogspot.com/2016/02/toggle-mod-mini-militia-v2215-unlimited.html
build http://ncll.us/Goto.asp?URL=https://sihanandi.blogspot.com/2016/02/toggle-mod-mini-militia-v2215-unlimited.html
above http://ndo.lg.ua/ru/redirect?url=https://sihanandi.blogspot.com/2016/02/toggle-mod-mini-militia-v2215-unlimited.html
average http://nepaltrust.gov.np/site/languages/languageA/2?url=https://sihanandi.blogspot.com/2016/02/toggle-mod-mini-militia-v2215-unlimited.html
for http://ness-ziona.muni.il/redir.asp?url=https://sihanandi.blogspot.com/2016/02/toggle-mod-mini-militia-v2215-unlimited.html
asking http://net-model.com/Shared/Redirect.asp?Area=Forums&ID=1396683&URL=https://sihanandi.blogspot.com/2016/02/toggle-mod-mini-militia-v2215-unlimited.html
price http://netaudio.bai-hua.org/fwd.php?url=https://sihanandi.blogspot.com/2016/02/toggle-mod-mini-militia-v2215-unlimited.html
and http://netstop.co.nz/homepage/track.aspx?url=https://sihanandi.blogspot.com/2016/02/toggle-mod-mini-militia-v2215-unlimited.html
solid http://neuropedwikia.es/ext_link?url=https://sihanandi.blogspot.com/2016/02/toggle-mod-mini-militia-v2215-unlimited.html
handset http://new.0points.com/wp/wp-content/plugins/wp-js-external-link-info/redirect.php?url=https://sihanandi.blogspot.com/2016/02/toggle-mod-mini-militia-v2215-unlimited.html
go http://new.campaignpartner.be/visit.asp?MID=101790&Url=https://sihanandi.blogspot.com/2016/02/toggle-mod-mini-militia-v2215-unlimited.html
for http://new.campaignpartner.be/visit.asp?MID=107853&Url=https://sihanandi.blogspot.com/2016/02/toggle-mod-mini-militia-v2215-unlimited.html
you http://new.mygreek.fm/redirect?url=https://sihanandi.blogspot.com/2016/02/toggle-mod-mini-militia-v2215-unlimited.html
simply http://newmovies.ro/trailere/redir.php?url=https://sihanandi.blogspot.com/2016/02/toggle-mod-mini-militia-v2215-unlimited.html
need http://news-room.pl/index.php?proxy=2&domain=https://sihanandi.blogspot.com/2016/02/toggle-mod-mini-militia-v2215-unlimited.html
use http://news.istella.it/url/cluster-Italia-titolo:1:9?url=https://sihanandi.blogspot.com/2016/02/toggle-mod-mini-militia-v2215-unlimited.html
4G http://news.ldv.co/out?url=https://sihanandi.blogspot.com/2016/02/toggle-mod-mini-militia-v2215-unlimited.html
data http://news.mt.co.kr/share.php?url=https://sihanandi.blogspot.com/2016/02/toggle-mod-mini-militia-v2215-unlimited.html
smartphone http://news.ntu.edu.sg/Pages/NewsDetail.aspx?URL=https://sihanandi.blogspot.com/2016/02/toggle-mod-mini-militia-v2215-unlimited.html
but http://news.techlabs.kz/click.php?url=https://sihanandi.blogspot.com/2016/02/toggle-mod-mini-militia-v2215-unlimited.html
dont http://news2day.ru/go.php?url=https://sihanandi.blogspot.com/2016/02/toggle-mod-mini-militia-v2215-unlimited.html
want http://newsblurt.com/nblive/modules/mod_jw_srfr/redir.php?url=https://sihanandi.blogspot.com/2016/02/toggle-mod-mini-militia-v2215-unlimited.html
spend http://newsheadquarter.com/read.php?ref=FexRss&aid=&tid=11A9ED63BABE46B39702A577C4B91863&url=https://sihanandi.blogspot.com/2016/02/toggle-mod-mini-militia-v2215-unlimited.html
half http://newsletter.namaste.co.il/pub/redirecturl.asp?letterID=29&letterPostID=1&categoryID=100&urlType=homepage&url=https://sihanandi.blogspot.com/2016/02/toggle-mod-mini-militia-v2215-unlimited.html
your http://newslist.huttcity.govt.nz/t.aspx?S=11&ID=654&NL=32&N=657&SI=9392&URL=https://sihanandi.blogspot.com/2016/02/toggle-mod-mini-militia-v2215-unlimited.html
paycheck http://newstalkkcli.com/modules/mod_jw_srfr/redir.php?url=https://sihanandi.blogspot.com/2016/02/toggle-mod-mini-militia-v2215-unlimited.html
do http://nextren.grid.id/tag/xiaomi-redmi-5a?url=https://sihanandi.blogspot.com/2016/02/toggle-mod-mini-militia-v2215-unlimited.html
not http://nghean.vnpt.vn/modules/banner/click.php?id=44&url=https://sihanandi.blogspot.com/2016/02/toggle-mod-mini-militia-v2215-unlimited.html
phone http://ngmdb.usgs.gov/ngm-bin/count_pub_refs.pl?publisher=ARGS&url=https://sihanandi.blogspot.com/2016/02/toggle-mod-mini-militia-v2215-unlimited.html
game http://nhyb.us/Goto.asp?URL=https://sihanandi.blogspot.com/2016/02/toggle-mod-mini-militia-v2215-unlimited.html
due http://nicmexico.mx/jsf/static_content/external_redirect.jsf?url=https://sihanandi.blogspot.com/2016/02/toggle-mod-mini-militia-v2215-unlimited.html
low http://nimbus.ximnet.com.my/Email_OpenCounter.aspx?EmailId=03803706-9692-4c4c-8e2f-8f2a711302e6&url=https://sihanandi.blogspot.com/2016/02/toggle-mod-mini-militia-v2215-unlimited.html
powered http://njp.co.jp/cgi-bin/seikyu/url_jmp.cgi?url=https://sihanandi.blogspot.com/2016/02/toggle-mod-mini-militia-v2215-unlimited.html
internals http://nklibrary.kz/go/url=https://sihanandi.blogspot.com/2016/02/toggle-mod-mini-militia-v2215-unlimited.html
but http://nmrshiftdb.nmr.uni-koeln.de/derefer.jsp?url=https://sihanandi.blogspot.com/2016/02/toggle-mod-mini-militia-v2215-unlimited.html
copes http://no8hr.co.nz/ra.asp?m=5&p=&url=https://sihanandi.blogspot.com/2016/02/toggle-mod-mini-militia-v2215-unlimited.html
with http://northparklittleleague.org/Goto.asp?URL=https://sihanandi.blogspot.com/2016/02/toggle-mod-mini-militia-v2215-unlimited.html
video http://noticias.sapo.tl/comment/?url=https://sihanandi.blogspot.com/2016/02/toggle-mod-mini-militia-v2215-unlimited.html
fine http://novavision-it.com/novavisionseo/redirect.php?url=https://sihanandi.blogspot.com/2016/02/toggle-mod-mini-militia-v2215-unlimited.html
display http://nsdig2gapps.ncsi.gov.om:8080/geoportalar/catalog/livedata/embed.jsp?url=https://sihanandi.blogspot.com/2016/02/toggle-mod-mini-militia-v2215-unlimited.html
quite http://nsdig2gapps.ncsi.gov.om:8080/geoportalar/catalog/search/resource/livedata-preview.page?uuid={B6CF979B-4F9B-4BD4-A861-255632638B25}&url=https://sihanandi.blogspot.com/2016/02/toggle-mod-mini-militia-v2215-unlimited.html
washed http://nttbj.itp.ne.jp/servlet/jp.ne.itp.comm.ICMSendRedirectOutCont?kok=11&ktid=TO0012032800000096&clk=201&mcd=smp&jump=1&url=https://sihanandi.blogspot.com/2016/02/toggle-mod-mini-militia-v2215-unlimited.html
out http://nudism.kh.ua/go/url=https://sihanandi.blogspot.com/2016/02/toggle-mod-mini-militia-v2215-unlimited.html
but http://nuevodiarioweb-prod.troop.com.ar/incrementar_clicks_banner/?z=07e1cd7dca89a1678042477183b7ac3f&b=013d407166ec4fa56eb1e1f8cbe183b9&url=https://sihanandi.blogspot.com/2016/02/toggle-mod-mini-militia-v2215-unlimited.html
clean http://null-prog.ru/redirect/?url=https://sihanandi.blogspot.com/2016/02/toggle-mod-mini-militia-v2215-unlimited.html
Android http://numama.ru/go/url=https://sihanandi.blogspot.com/2016/02/toggle-mod-mini-militia-v2215-unlimited.html
software http://nwll.us/Goto.asp?URL=https://sihanandi.blogspot.com/2016/02/toggle-mod-mini-militia-v2215-unlimited.html
makes http://nym5g7.jf.land.to/rank.cgi?mode=link&id=9&url=https://sihanandi.blogspot.com/2016/02/toggle-mod-mini-militia-v2215-unlimited.html
for http://nzlife.nz/index.php?m=poster&c=index&a=poster_click&sitespaceid=1&id=223&url=https://sihanandi.blogspot.com/2016/02/toggle-mod-mini-militia-v2215-unlimited.html
this http://oakdome.com/k5/linkster/index.php?LID=32&URL=https://sihanandi.blogspot.com/2016/02/toggle-mod-mini-militia-v2215-unlimited.html
You http://obdachlos.casadocerrado.com.pt/site/90eeaa2b7e9a47f2bc84e2b6eb526f31/default?url=https://sihanandi.blogspot.com/2016/02/toggle-mod-mini-militia-v2215-unlimited.html
wont http://oceania.research.um.edu.mt/redirectWebPage/redirectWebPage.cgi?URL=https://sihanandi.blogspot.com/2016/02/toggle-mod-mini-militia-v2215-unlimited.html
want http://ocw.aoc.ntua.gr/modules/link/go.php?course=ECE140&id=419&url=https://sihanandi.blogspot.com/2016/02/toggle-mod-mini-militia-v2215-unlimited.html
post http://oha-d.com/w3a/redirect.php?redirect=https://sihanandi.blogspot.com/2016/02/toggle-mod-mini-militia-v2215-unlimited.html
many http://oilregeneration.globecore.com/redirect.php?url=https://sihanandi.blogspot.com/2016/02/toggle-mod-mini-militia-v2215-unlimited.html
pictures http://ok1dub.cz/proxy/index.php?url=https://sihanandi.blogspot.com/2016/02/toggle-mod-mini-militia-v2215-unlimited.html
from http://old.civillaw.com.cn/explorer/hitting.asp?id=754&url=https://sihanandi.blogspot.com/2016/02/toggle-mod-mini-militia-v2215-unlimited.html
notgreat http://old.dcz.gov.ua/redirect?url=https://sihanandi.blogspot.com/2016/02/toggle-mod-mini-militia-v2215-unlimited.html
camera http://old.egillarnason.is/view/common/knowledgebase/redirectlink?Url=https://sihanandi.blogspot.com/2016/02/toggle-mod-mini-militia-v2215-unlimited.html
Instagram http://old.franciszkanie.pl/klik.php?url=https://sihanandi.blogspot.com/2016/02/toggle-mod-mini-militia-v2215-unlimited.html
but http://old.hcmuc.de/redir.php?url=https://sihanandi.blogspot.com/2016/02/toggle-mod-mini-militia-v2215-unlimited.html
you http://old.mariuszli.wroclaw.pl/pliki/php/skocz.php?url=https://sihanandi.blogspot.com/2016/02/toggle-mod-mini-militia-v2215-unlimited.html
want http://old.nais.net.cn/site/NetResourceCount.aspx?Id=bd07fb07-d2fc-4ff6-a5df-b6e67b02ad45&ChannelId=AEDE189A-72A8-4E3A-B18C-92E4561019CA&Url=https://sihanandi.blogspot.com/2016/02/toggle-mod-mini-militia-v2215-unlimited.html
decent http://old.radiodei.fi/bannerclick.php?url=https://sihanandi.blogspot.com/2016/02/toggle-mod-mini-militia-v2215-unlimited.html
snapper http://old.stodolni.cz/redir.php?URL=https://sihanandi.blogspot.com/2016/02/toggle-mod-mini-militia-v2215-unlimited.html
youll http://old.tyrving.idrett.no/ezp/index.php/link/gotolink/addhit/1963/index977b.html?Url=https://sihanandi.blogspot.com/2016/02/toggle-mod-mini-militia-v2215-unlimited.html
look http://oldmutual.co.za/pages/pdfgen.aspx?url=https://sihanandi.blogspot.com/2016/02/toggle-mod-mini-militia-v2215-unlimited.html
phones http://oldplanktrailbank.wintrust.us/you-are-leaving?url=https://sihanandi.blogspot.com/2016/02/toggle-mod-mini-militia-v2215-unlimited.html
that http://oneclickonly.de/redirect.php?url=https://sihanandi.blogspot.com/2016/02/toggle-mod-mini-militia-v2215-unlimited.html
cost http://onehilo.com/redir.php?url=https://sihanandi.blogspot.com/2016/02/toggle-mod-mini-militia-v2215-unlimited.html
more http://onetwo.tv/away.php?url=https://sihanandi.blogspot.com/2016/02/toggle-mod-mini-militia-v2215-unlimited.html
EE http://online-business-world.com/redirect.php?url=https://sihanandi.blogspot.com/2016/02/toggle-mod-mini-militia-v2215-unlimited.html
Hawk http://online.microfarm.co.za/en-gb/redirectUrl?url=https://sihanandi.blogspot.com/2016/02/toggle-mod-mini-militia-v2215-unlimited.html
re http://onlinebee.in/st?api=553b28347ff40c2a86fe162c38db338ad0dfd445&url=https://sihanandi.blogspot.com/2016/02/toggle-mod-mini-militia-v2215-unlimited.html
with http://onlinejobsfind.com/redir.php?url=https://sihanandi.blogspot.com/2016/02/toggle-mod-mini-militia-v2215-unlimited.html
Moto http://onlinemanuals.txdot.gov/help/urlstatusgo.html?url=https://sihanandi.blogspot.com/2016/02/toggle-mod-mini-militia-v2215-unlimited.html
G5 http://opac-istec.prebi.unlp.edu.ar/resolve/index/?url=https://sihanandi.blogspot.com/2016/02/toggle-mod-mini-militia-v2215-unlimited.html
one http://opac.yokohama-cu.ac.jp/mylimedio/ident.do;jsessionid=9f288e92008f5bade4d09f56bf6e?etype=ejournal&url=https://sihanandi.blogspot.com/2016/02/toggle-mod-mini-militia-v2215-unlimited.html
best http://opel-club.md/go/url=https://sihanandi.blogspot.com/2016/02/toggle-mod-mini-militia-v2215-unlimited.html
budget http://open.sch.ng/adengine/adclick.php?adid=2&url=https://sihanandi.blogspot.com/2016/02/toggle-mod-mini-militia-v2215-unlimited.html
smartphones http://opendap-dm1.knmi.nl:8080/thredds/view/idv.jnlp?url=https://sihanandi.blogspot.com/2016/02/toggle-mod-mini-militia-v2215-unlimited.html
UK http://openlink.access.yonsei.ac.kr/link.n2s?url=https://sihanandi.blogspot.com/2016/02/toggle-mod-mini-militia-v2215-unlimited.html
Read http://openlink.ca.skku.edu/link.n2s?url=https://sihanandi.blogspot.com/2016/02/toggle-mod-mini-militia-v2215-unlimited.html
our http://openlink.glibproxy.gachon.ac.kr/link.n2s?url=https://sihanandi.blogspot.com/2016/02/toggle-mod-mini-militia-v2215-unlimited.html
EE http://openlink.lib.keei.re.kr:8000/link.n2s?url=https://sihanandi.blogspot.com/2016/02/toggle-mod-mini-militia-v2215-unlimited.html
Hawk http://openlink.libmeta.knou.ac.kr:8090/link.n2s?url=https://sihanandi.blogspot.com/2016/02/toggle-mod-mini-militia-v2215-unlimited.html
review http://openlink.libproxy.nahf.or.kr:8000/link.n2s?url=https://sihanandi.blogspot.com/2016/02/toggle-mod-mini-militia-v2215-unlimited.html
Xiaomi http://openlink.library.unist.ac.kr/link.n2s?url=https://sihanandi.blogspot.com/2016/02/toggle-mod-mini-militia-v2215-unlimited.html
Redmi http://openlink.mproxy.inje.ac.kr/link.n2s?url=https://sihanandi.blogspot.com/2016/02/toggle-mod-mini-militia-v2215-unlimited.html
Note http://openlink.proxy.kiep.go.kr/link.n2s?url=https://sihanandi.blogspot.com/2016/02/toggle-mod-mini-militia-v2215-unlimited.html
5A http://openlink.uhlib.schmc.ac.kr/link.n2s?url=https://sihanandi.blogspot.com/2016/02/toggle-mod-mini-militia-v2215-unlimited.html
2GB http://oralmedrd.net/redir.php?url=https://sihanandi.blogspot.com/2016/02/toggle-mod-mini-militia-v2215-unlimited.html
Xiaomi http://orangelittleleague.org/Goto.asp?URL=https://sihanandi.blogspot.com/2016/02/toggle-mod-mini-militia-v2215-unlimited.html
Redmi http://oriental.ru/re/re.php?url=https://sihanandi.blogspot.com/2016/02/toggle-mod-mini-militia-v2215-unlimited.html
Note http://origami.mow.fm/go.php?url=https://sihanandi.blogspot.com/2016/02/toggle-mod-mini-militia-v2215-unlimited.html
5A http://origen-img.consentido.com.mx/external?url=https://sihanandi.blogspot.com/2016/02/toggle-mod-mini-militia-v2215-unlimited.html
2GB http://orkanger-vel.no/redir.php?id=48&pid=33&url=https://sihanandi.blogspot.com/2016/02/toggle-mod-mini-militia-v2215-unlimited.html
Rating http://orunia-gorna.mojeosiedle.pl/rd.php?url=https://sihanandi.blogspot.com/2016/02/toggle-mod-mini-militia-v2215-unlimited.html
ratingsratingsratingsratingsratings http://oss-chicago.com/redir.php?url=https://sihanandi.blogspot.com/2016/02/toggle-mod-mini-militia-v2215-unlimited.html
Reviewed http://osym.tercihrobotu.com.tr/surf.aspx?dec=0&url=https://sihanandi.blogspot.com/2016/02/toggle-mod-mini-militia-v2215-unlimited.html
30 http://ottawaconventions.ca/go/link.php?url=https://sihanandi.blogspot.com/2016/02/toggle-mod-mini-militia-v2215-unlimited.html
April http://oueteater.vorulinn.ee/redirect.php?url=https://sihanandi.blogspot.com/2016/02/toggle-mod-mini-militia-v2215-unlimited.html
2018 http://packaging.com.pl/index.php?action=go_url&url=https://sihanandi.blogspot.com/2016/02/toggle-mod-mini-militia-v2215-unlimited.html
2GB http://pafe.jcom.to/shop/cs/cs.cgi?go=1&url=https://sihanandi.blogspot.com/2016/02/toggle-mod-mini-militia-v2215-unlimited.html
RAM http://pages.ebay.com.my/help/feedback/scores-reputation.html?url=https://sihanandi.blogspot.com/2016/02/toggle-mod-mini-militia-v2215-unlimited.html
model http://pakonen.kapsi.fi/redir.php?url=https://sihanandi.blogspot.com/2016/02/toggle-mod-mini-militia-v2215-unlimited.html
we http://palk.crew.ee/click.php?url=https://sihanandi.blogspot.com/2016/02/toggle-mod-mini-militia-v2215-unlimited.html
reviewed http://parceiro.futebolmelhor.com.br/Redirect/?id=95&tipo=T&url=https://sihanandi.blogspot.com/2016/02/toggle-mod-mini-militia-v2215-unlimited.html
lacks http://pariki.com.ua/index.php?option=com_loudmouth&task=derefer&url=https://sihanandi.blogspot.com/2016/02/toggle-mod-mini-militia-v2215-unlimited.html
features http://paring.planet.ee/edasi.php?URL=https://sihanandi.blogspot.com/2016/02/toggle-mod-mini-militia-v2215-unlimited.html
compared http://parknumsamutprakarn.go.th/public/list/data/index/menu/276/page/[url=https://sihanandi.blogspot.com/2016/02/toggle-mod-mini-militia-v2215-unlimited.html
betterspecced http://paunvressa.cf/redir_links2.php?l_id=10&url=https://sihanandi.blogspot.com/2016/02/toggle-mod-mini-militia-v2215-unlimited.html
Redmi http://pavlodar-auto.kz/go/url=https://sihanandi.blogspot.com/2016/02/toggle-mod-mini-militia-v2215-unlimited.html
Note http://pavon.kz/proxy?url=https://sihanandi.blogspot.com/2016/02/toggle-mod-mini-militia-v2215-unlimited.html
5A http://payamak57.ir/go/index.php?p=https://sihanandi.blogspot.com/2016/02/toggle-mod-mini-militia-v2215-unlimited.html
options http://pc-driver.ru/redirect.php?url=https://sihanandi.blogspot.com/2016/02/toggle-mod-mini-militia-v2215-unlimited.html
that http://pcsamerica.net/site/redirect/?type=advertisement&pk=111727&referer=/bases/hill-afb/directory/SIC/9903/&url=https://sihanandi.blogspot.com/2016/02/toggle-mod-mini-militia-v2215-unlimited.html
cost http://pdf.pxlpartner.ch/index.cfm?url=https://sihanandi.blogspot.com/2016/02/toggle-mod-mini-militia-v2215-unlimited.html
only http://peacemaker.st/cgi-bin/peace-dir/link.pl?su=3&url=https://sihanandi.blogspot.com/2016/02/toggle-mod-mini-militia-v2215-unlimited.html
slightly http://pensionersportal.gov.in/Redirect.asp?url=https://sihanandi.blogspot.com/2016/02/toggle-mod-mini-militia-v2215-unlimited.html
more http://people.cn.ua/go/url=https://sihanandi.blogspot.com/2016/02/toggle-mod-mini-militia-v2215-unlimited.html
res http://perfsonar.grena.ge/perfsonar-graphs/?source=217.147.224.54&dest=147.91.6.246&url=https://sihanandi.blogspot.com/2016/02/toggle-mod-mini-militia-v2215-unlimited.html
no http://perfsonar.marwan.ma/perfsonar-graphs/?source=196.200.160.9&dest=134.158.123.183&url=https://sihanandi.blogspot.com/2016/02/toggle-mod-mini-militia-v2215-unlimited.html
fingerprint http://perpus.yarsi.ac.id/baru1/goto.php?url=https://sihanandi.blogspot.com/2016/02/toggle-mod-mini-militia-v2215-unlimited.html
scanner http://petercheckiez.com/redir.php?url=https://sihanandi.blogspot.com/2016/02/toggle-mod-mini-militia-v2215-unlimited.html
slower http://pfrda.org.in/ExternalUrl.cshtml?url=https://sihanandi.blogspot.com/2016/02/toggle-mod-mini-militia-v2215-unlimited.html
processor http://pgdbj.jp/cgi-bin/sabre_line/SABRE2RDT.cgi?url=https://sihanandi.blogspot.com/2016/02/toggle-mod-mini-militia-v2215-unlimited.html
less http://pgire.it/redirect_click.aspx?id=1996&url=https://sihanandi.blogspot.com/2016/02/toggle-mod-mini-militia-v2215-unlimited.html
impressive http://pharmacy.am/inc/redirect.php?url=https://sihanandi.blogspot.com/2016/02/toggle-mod-mini-militia-v2215-unlimited.html
selfie http://physik.uni-graz.at/~cbl/C+P/scripts/warp.php?url=https://sihanandi.blogspot.com/2016/02/toggle-mod-mini-militia-v2215-unlimited.html
camera http://pia.ge/gotoaddress?url=https://sihanandi.blogspot.com/2016/02/toggle-mod-mini-militia-v2215-unlimited.html
and http://pierritoss.cf/linkto.php?url=https://sihanandi.blogspot.com/2016/02/toggle-mod-mini-militia-v2215-unlimited.html
less http://piwik.8002.ch/index.php?module=Proxy&action=redirect&url=https://sihanandi.blogspot.com/2016/02/toggle-mod-mini-militia-v2215-unlimited.html
memory http://pixelark.com/bulletins/stats/?us=14807/0/click&url=https://sihanandi.blogspot.com/2016/02/toggle-mod-mini-militia-v2215-unlimited.html
and http://pixelplastic.de/ct.ashx?id=80a5f1df-85dd-494e-a055-975398f7707f&url=https://sihanandi.blogspot.com/2016/02/toggle-mod-mini-militia-v2215-unlimited.html
storage http://pkeuro.net/redirect.php?url=https://sihanandi.blogspot.com/2016/02/toggle-mod-mini-militia-v2215-unlimited.html
But http://po.st/v1/share/pinterest?publisherKey=jj3s7kubef9il40pcpep&url=https://sihanandi.blogspot.com/2016/02/toggle-mod-mini-militia-v2215-unlimited.html
none http://podster.fm/linker?url=https://sihanandi.blogspot.com/2016/02/toggle-mod-mini-militia-v2215-unlimited.html
this http://pokerdeal.ru/go/url=https://sihanandi.blogspot.com/2016/02/toggle-mod-mini-militia-v2215-unlimited.html
takes http://popularity.csail.mit.edu/cgi-bin/image.py?url=https://sihanandi.blogspot.com/2016/02/toggle-mod-mini-militia-v2215-unlimited.html
away http://popups.ulg.ac.be/bao/mkh2p/index.php?upd=1391589408&url=https://sihanandi.blogspot.com/2016/02/toggle-mod-mini-militia-v2215-unlimited.html
from http://popups.ulg.ac.be/bao/mkh2p/index.php?upd=1482833899&url=https://sihanandi.blogspot.com/2016/02/toggle-mod-mini-militia-v2215-unlimited.html
fact http://portal.korearth.net/jump.php?sid=110&url=https://sihanandi.blogspot.com/2016/02/toggle-mod-mini-militia-v2215-unlimited.html
this http://portal.mbsfestival.com.au/eshowbag/redirect.php?type=website&url=https://sihanandi.blogspot.com/2016/02/toggle-mod-mini-militia-v2215-unlimited.html
superbudget http://portal.speedy.com.ar:10101/wsc/stc/html/gotoURL.html?URL=https://sihanandi.blogspot.com/2016/02/toggle-mod-mini-militia-v2215-unlimited.html
smartphone http://portalagricola.cl/Contar.php?url=https://sihanandi.blogspot.com/2016/02/toggle-mod-mini-militia-v2215-unlimited.html
offers http://poseidonlacrosse.usl.la/Goto.asp?URL=https://sihanandi.blogspot.com/2016/02/toggle-mod-mini-militia-v2215-unlimited.html
extraordinary http://poslovniportal.si/prikaz.php?slika=upload/image/CMSR_6.jpg&url=https://sihanandi.blogspot.com/2016/02/toggle-mod-mini-militia-v2215-unlimited.html
value http://pr.kunstek.de/index.php?page=data&url=https://sihanandi.blogspot.com/2016/02/toggle-mod-mini-militia-v2215-unlimited.html
under http://prairiebaseball.ca/tracker/index.html?t=ad&pool_id=2&ad_id=7&url=https://sihanandi.blogspot.com/2016/02/toggle-mod-mini-militia-v2215-unlimited.html
£70 http://prap.torino.it/gotoURL.asp?url=https://sihanandi.blogspot.com/2016/02/toggle-mod-mini-militia-v2215-unlimited.html
doesnt http://precaritas.free.fr/yacs/links/click.php?url=https://sihanandi.blogspot.com/2016/02/toggle-mod-mini-militia-v2215-unlimited.html
excel http://premailer.dialect.ca/?bookmarklet=true&url=https://sihanandi.blogspot.com/2016/02/toggle-mod-mini-militia-v2215-unlimited.html
any http://premiumproxy.net/check-headers-status.php?url=https://sihanandi.blogspot.com/2016/02/toggle-mod-mini-militia-v2215-unlimited.html
one http://press-booksweb.uchicago.edu/MOSSSF/Token.aspx?URL=https://sihanandi.blogspot.com/2016/02/toggle-mod-mini-militia-v2215-unlimited.html
particular http://press-club.sd.ua/go/url=https://sihanandi.blogspot.com/2016/02/toggle-mod-mini-militia-v2215-unlimited.html
thing http://pressabout.us/go?url=https://sihanandi.blogspot.com/2016/02/toggle-mod-mini-militia-v2215-unlimited.html
but http://pretty-dog.bz/ne55_jump.asp?EID=746&URL=https://sihanandi.blogspot.com/2016/02/toggle-mod-mini-militia-v2215-unlimited.html
capable http://prf.hn/click/camref:11l9V5/pubref:https://sihanandi.blogspot.com/2016/02/toggle-mod-mini-militia-v2215-unlimited.html
for http://prmac.com/external_link.php?release=77512&l=2&url=https://sihanandi.blogspot.com/2016/02/toggle-mod-mini-militia-v2215-unlimited.html
less http://productkhoj.in/out?url=https://sihanandi.blogspot.com/2016/02/toggle-mod-mini-militia-v2215-unlimited.html
demanding http://profiles.responsemail.co.uk/linktrack.php?pf=hvmci&l=7&cid=904&esid=1514292&url=https://sihanandi.blogspot.com/2016/02/toggle-mod-mini-militia-v2215-unlimited.html
users http://profitoolinfo.ru/?goto=jump&url=https://sihanandi.blogspot.com/2016/02/toggle-mod-mini-militia-v2215-unlimited.html
and http://profkadastr.ru/redirect?url=https://sihanandi.blogspot.com/2016/02/toggle-mod-mini-militia-v2215-unlimited.html
nicely http://programmzeitung.programmonline.ch/ProgonEvent/ProgonEvent110833?xpage=celements_ajax&ajax_mode=redirectURL&url=https://sihanandi.blogspot.com/2016/02/toggle-mod-mini-militia-v2215-unlimited.html
designed http://projectos.est.ipcb.pt/webbid/clickthrough.php?banner=2&url=https://sihanandi.blogspot.com/2016/02/toggle-mod-mini-militia-v2215-unlimited.html
for http://projects.from.tv/redirect.cgi?url=https://sihanandi.blogspot.com/2016/02/toggle-mod-mini-militia-v2215-unlimited.html
plastic http://prototype43.com/Link.asp?IdS=0000E5-C50C000&Url=https://sihanandi.blogspot.com/2016/02/toggle-mod-mini-militia-v2215-unlimited.html
phone http://prourls.co/product/?url=https://sihanandi.blogspot.com/2016/02/toggle-mod-mini-militia-v2215-unlimited.html
you http://proxy.cm.umoncton.ca/login?url=https://sihanandi.blogspot.com/2016/02/toggle-mod-mini-militia-v2215-unlimited.html
do http://proyectos.bibliotecas.csic.es/sp/subjects/statsURICI.php?id=151&proxy=0&url=https://sihanandi.blogspot.com/2016/02/toggle-mod-mini-militia-v2215-unlimited.html
buy http://ps.bwii.at/topic/http/live/demo_http.php?url=https://sihanandi.blogspot.com/2016/02/toggle-mod-mini-militia-v2215-unlimited.html
Note http://psb.hpc.utfsm.cl/perfsonar-graphs/?source=146.83.90.6&dest=134.61.24.194&url=https://sihanandi.blogspot.com/2016/02/toggle-mod-mini-militia-v2215-unlimited.html
5A http://psi-lab.ru/engine/redirect.php?url=https://sihanandi.blogspot.com/2016/02/toggle-mod-mini-militia-v2215-unlimited.html
we http://psycure.jp/index/redirest/?id=1549&url=https://sihanandi.blogspot.com/2016/02/toggle-mod-mini-militia-v2215-unlimited.html
strongly http://psycure.jp/index/redirest/?id=3131&url=https://sihanandi.blogspot.com/2016/02/toggle-mod-mini-militia-v2215-unlimited.html
recommend http://publichealthwell.ie/new_redirect/?&content=resource&member=6841&catalogue=none&collections=none&url=https://sihanandi.blogspot.com/2016/02/toggle-mod-mini-militia-v2215-unlimited.html
choosing http://pullman-klcc.weblite.my/CampaignClickThru/campaign_ClickThru.aspx?CampID=aIM5tRmvqCanNXh9CeYArg==&MStr=rAV2/Hlv0QpVao5hCi5YIA==&CampStr=MZl5CX0rKoB6D39pmzyv6Q==&Type=Act&URL=https://sihanandi.blogspot.com/2016/02/toggle-mod-mini-militia-v2215-unlimited.html
Global http://punktgenau-business-consulting.caltec.cl/site/d945b5de60f4444f80275e7f94537151/home?url=https://sihanandi.blogspot.com/2016/02/toggle-mod-mini-militia-v2215-unlimited.html
variant http://puppy.com.my/cgi-bin/forum/gforum.cgi?url=https://sihanandi.blogspot.com/2016/02/toggle-mod-mini-militia-v2215-unlimited.html
for http://qa.salesexpo.com.pk/redirect?id=motifz&url=https://sihanandi.blogspot.com/2016/02/toggle-mod-mini-militia-v2215-unlimited.html
improved http://qaz.la/wp-content/themes/begin/inc/go.php?url=https://sihanandi.blogspot.com/2016/02/toggle-mod-mini-militia-v2215-unlimited.html
connectivity http://qldt.utt.edu.vn/CMCSoft.IU.Web.Info/Login.aspx?url=https://sihanandi.blogspot.com/2016/02/toggle-mod-mini-militia-v2215-unlimited.html
and http://qualityunit.postaffiliatepro.com/scripts/click.php?a_aid=mypap&a_bid=aa81b4f7&desturl=https://sihanandi.blogspot.com/2016/02/toggle-mod-mini-militia-v2215-unlimited.html
preinstallation http://quanlydaotao.tump.edu.vn/dhyd/Login.aspx?url=https://sihanandi.blogspot.com/2016/02/toggle-mod-mini-militia-v2215-unlimited.html
Google http://quarterhorsebreeder.com/redirect.asp?url=https://sihanandi.blogspot.com/2016/02/toggle-mod-mini-militia-v2215-unlimited.html
Services http://quarterhorsedirectory.com/redirect.asp?url=https://sihanandi.blogspot.com/2016/02/toggle-mod-mini-militia-v2215-unlimited.html
Read http://r.brandreward.com/?key=85422afb467e9456013a2a51d4dff702&id=jsr&url=https://sihanandi.blogspot.com/2016/02/toggle-mod-mini-militia-v2215-unlimited.html
our http://r.orange.fr/r?ref=mobile_undefined&url=https://sihanandi.blogspot.com/2016/02/toggle-mod-mini-militia-v2215-unlimited.html
Xiaomi http://r.sojump.net.cn/redirect.aspx?url=https://sihanandi.blogspot.com/2016/02/toggle-mod-mini-militia-v2215-unlimited.html
Redmi http://radio.newsrbk.ru/go.php?url=https://sihanandi.blogspot.com/2016/02/toggle-mod-mini-militia-v2215-unlimited.html
Note http://rai77.com/redirect?url=https://sihanandi.blogspot.com/2016/02/toggle-mod-mini-militia-v2215-unlimited.html
5A http://rakuten.112.2o7.net/b/ss/rakutencheckoutmain/4/?AQB=1&ndh=1&ce=UTF-8&v0=debut300_180701_in_debut300_toho&cc=JPY&ch=en&url=https://sihanandi.blogspot.com/2016/02/toggle-mod-mini-militia-v2215-unlimited.html
2GB http://rauccatoma.mott.pe/redirect.php?url=https://sihanandi.blogspot.com/2016/02/toggle-mod-mini-militia-v2215-unlimited.html
review http://rc-dom.ru/go/url=https://sihanandi.blogspot.com/2016/02/toggle-mod-mini-militia-v2215-unlimited.html
Xiaomi http://rc-fpv.pl/video.php?url=https://sihanandi.blogspot.com/2016/02/toggle-mod-mini-militia-v2215-unlimited.html
Redmi http://rcmultimedios.mx/go.php?ad=99&url=https://sihanandi.blogspot.com/2016/02/toggle-mod-mini-militia-v2215-unlimited.html
4A http://readinglist.bi.edu/link?url=https://sihanandi.blogspot.com/2016/02/toggle-mod-mini-militia-v2215-unlimited.html
Xiaomi http://readinglists.nottingham.edu.my/link?url=https://sihanandi.blogspot.com/2016/02/toggle-mod-mini-militia-v2215-unlimited.html
Redmi http://realestate.ocean.co.th/th/subsidiary/download1.php?url=https://sihanandi.blogspot.com/2016/02/toggle-mod-mini-militia-v2215-unlimited.html
4A http://redir.centrum.sk/stage2.php?url=https://sihanandi.blogspot.com/2016/02/toggle-mod-mini-militia-v2215-unlimited.html
Rating http://redir.netcentrum.sk/?noaudit&url=https://sihanandi.blogspot.com/2016/02/toggle-mod-mini-militia-v2215-unlimited.html
ratingsratingsratingsratingsratings http://redir.viddi.no/go.php?url=https://sihanandi.blogspot.com/2016/02/toggle-mod-mini-militia-v2215-unlimited.html
Reviewed http://redirect.namerock.com/redirect.asp?url=https://sihanandi.blogspot.com/2016/02/toggle-mod-mini-militia-v2215-unlimited.html
25 http://redirect.pixnet.tw/search.php?q=UK&url=https://sihanandi.blogspot.com/2016/02/toggle-mod-mini-militia-v2215-unlimited.html
April http://redirect.wlw.at/?url=https://sihanandi.blogspot.com/2016/02/toggle-mod-mini-militia-v2215-unlimited.html
2018 http://redirect.wlw.de/?url=https://sihanandi.blogspot.com/2016/02/toggle-mod-mini-militia-v2215-unlimited.html
Redmi http://redpussytube.com/go.php?track=cBFMfHkMZGBCfE8=&url=https://sihanandi.blogspot.com/2016/02/toggle-mod-mini-militia-v2215-unlimited.html
4A http://reg2.hcu.ac.th/uchome/link.php?url=https://sihanandi.blogspot.com/2016/02/toggle-mod-mini-militia-v2215-unlimited.html
ageing http://reklama.rybka.sk/link.php?from=319&size=1&to=629&b=3&url=https://sihanandi.blogspot.com/2016/02/toggle-mod-mini-militia-v2215-unlimited.html
and http://rent32.org/fa/go.php?url=https://sihanandi.blogspot.com/2016/02/toggle-mod-mini-militia-v2215-unlimited.html
yet http://rent4car.ir/fa/go.php?url=https://sihanandi.blogspot.com/2016/02/toggle-mod-mini-militia-v2215-unlimited.html
remains http://rentingcar.ir/fa/go.php?url=https://sihanandi.blogspot.com/2016/02/toggle-mod-mini-militia-v2215-unlimited.html
very http://replik.as/redirector.php?url=https://sihanandi.blogspot.com/2016/02/toggle-mod-mini-militia-v2215-unlimited.html
good http://reply.transindex.ro/t/?url=https://sihanandi.blogspot.com/2016/02/toggle-mod-mini-militia-v2215-unlimited.html
budget http://repositoriosdigitales.mincyt.gob.ar/dnet-web-generic/redirect.action?docId=dd367aee-5972-4301-a636-b1afdaffeb98_UmVwb3NpdG9yeVNlcnZpY2VSZXNvdXJjZXMvUmVwb3NpdG9yeVNlcnZpY2VSZXNvdXJjZVR5cGU=::oai:ri.conicet.gov.ar:11336/6582&url=https://sihanandi.blogspot.com/2016/02/toggle-mod-mini-militia-v2215-unlimited.html
phone http://repositoriosdigitales.mincyt.gob.ar:8380/dnet-web-generic/redirect.action?docId=dd367aee-5972-4301-a636-b1afdaffeb98_UmVwb3NpdG9yeVNlcnZpY2VSZXNvdXJjZXMvUmVwb3NpdG9yeVNlcnZpY2VSZXNvdXJjZVR5cGU=::oai:ri.conicet.gov.ar:11336/5654&url=https://sihanandi.blogspot.com/2016/02/toggle-mod-mini-militia-v2215-unlimited.html
and http://resquel.com/ssb/ct.ashx?id=dc3e2547-036f-4150-bf20-0d9e4233132f&url=https://sihanandi.blogspot.com/2016/02/toggle-mod-mini-militia-v2215-unlimited.html
decent http://restkultur.ch/php/links/linkster.php?link_id=198&URL=https://sihanandi.blogspot.com/2016/02/toggle-mod-mini-militia-v2215-unlimited.html
allrounder http://restkultur.ch/php/links/linkster.php?link_id=7&URL=https://sihanandi.blogspot.com/2016/02/toggle-mod-mini-militia-v2215-unlimited.html
under http://result.folder.jp/tool/location.cgi?url=https://sihanandi.blogspot.com/2016/02/toggle-mod-mini-militia-v2215-unlimited.html
£100 http://review.pns.vn/redirect.php?url=https://sihanandi.blogspot.com/2016/02/toggle-mod-mini-militia-v2215-unlimited.html
Though http://review.urlz.gr/redirect.php?url=https://sihanandi.blogspot.com/2016/02/toggle-mod-mini-militia-v2215-unlimited.html
lacks http://review.wfsbo.com/redirect.php?url=https://sihanandi.blogspot.com/2016/02/toggle-mod-mini-militia-v2215-unlimited.html
more http://revisaodosite.com/redirect.php?url=https://sihanandi.blogspot.com/2016/02/toggle-mod-mini-militia-v2215-unlimited.html
modern http://rf.nxzgame.com/redirect.php?url=https://sihanandi.blogspot.com/2016/02/toggle-mod-mini-militia-v2215-unlimited.html
aspects http://rgho.st/tags/[url=https://sihanandi.blogspot.com/2016/02/toggle-mod-mini-militia-v2215-unlimited.html
such http://rheinhessen.infomaxnet.de/imxsearch/showDoc?url=https://sihanandi.blogspot.com/2016/02/toggle-mod-mini-militia-v2215-unlimited.html
fingerprint http://roadceo.com/link.php?type=camp&type_id=11&url=https://sihanandi.blogspot.com/2016/02/toggle-mod-mini-militia-v2215-unlimited.html
scanner http://roboliker.org/redir.php?url=https://sihanandi.blogspot.com/2016/02/toggle-mod-mini-militia-v2215-unlimited.html
metal http://rodeo.to/media/link/redirect.php?url=https://sihanandi.blogspot.com/2016/02/toggle-mod-mini-militia-v2215-unlimited.html
build http://rogarema.be/portal/countclick.php?url=https://sihanandi.blogspot.com/2016/02/toggle-mod-mini-militia-v2215-unlimited.html
and http://roland.pri.ee/?a=link&url=https://sihanandi.blogspot.com/2016/02/toggle-mod-mini-militia-v2215-unlimited.html
18 http://rompiendo.com.py/inc/ads/adsCounter.php?inf=38,14,124,&url=https://sihanandi.blogspot.com/2016/02/toggle-mod-mini-militia-v2215-unlimited.html
display http://ronforhomes.bmobilized.com/?task=get&url=https://sihanandi.blogspot.com/2016/02/toggle-mod-mini-militia-v2215-unlimited.html
its http://roren.ro/ro/link?url=https://sihanandi.blogspot.com/2016/02/toggle-mod-mini-militia-v2215-unlimited.html
almost http://rotarybrighton.com.au/click.php?id=1&em=stuart.mcarthur@nihon2000.com&url=https://sihanandi.blogspot.com/2016/02/toggle-mod-mini-militia-v2215-unlimited.html
impossible http://royaldesign.se/redirect.aspx?url=https://sihanandi.blogspot.com/2016/02/toggle-mod-mini-militia-v2215-unlimited.html
argue http://rsdemo.fuv.se/eng/XcDirRedirect.asp?ID=846&url=https://sihanandi.blogspot.com/2016/02/toggle-mod-mini-militia-v2215-unlimited.html
this http://rucredit.org/go.php?url=https://sihanandi.blogspot.com/2016/02/toggle-mod-mini-militia-v2215-unlimited.html
price http://s-michelle.ru/go/url=https://sihanandi.blogspot.com/2016/02/toggle-mod-mini-militia-v2215-unlimited.html
4A http://s.kakaku.com/jump/jump.asp?url=https://sihanandi.blogspot.com/2016/02/toggle-mod-mini-militia-v2215-unlimited.html
has http://s1.mailhunter.com.tw/mailhunter_a/click.aspx?url=https://sihanandi.blogspot.com/2016/02/toggle-mod-mini-militia-v2215-unlimited.html
since http://s1.shinystat.it/cgi-bin/redir.cgi?URL=https://sihanandi.blogspot.com/2016/02/toggle-mod-mini-militia-v2215-unlimited.html
been http://s212.n253.n6.n64.static.myhostcenter.com/dirinc/click.php?url=https://sihanandi.blogspot.com/2016/02/toggle-mod-mini-militia-v2215-unlimited.html
succeeded http://safejmp.com/?appid=159&token=575b6bbf98aea960&ts=1492020944&url=https://sihanandi.blogspot.com/2016/02/toggle-mod-mini-militia-v2215-unlimited.html
by http://safindit.co.za/rtt-kimberley/redirect?url=https://sihanandi.blogspot.com/2016/02/toggle-mod-mini-militia-v2215-unlimited.html
5A http://safindit.co.za/rtt-klerksdorp/redirect?url=https://sihanandi.blogspot.com/2016/02/toggle-mod-mini-militia-v2215-unlimited.html
but http://sailorswithdisabilities.com/click.php?id=4109621&em=rogermcmillan@yaffa.com.au&url=https://sihanandi.blogspot.com/2016/02/toggle-mod-mini-militia-v2215-unlimited.html
res http://saintpaulchamber.net/CWT/External/WCPages/WCdirectory/Directory.aspx?listingid=8690&profileid=8K2D778H2N&action=uweb&url=https://sihanandi.blogspot.com/2016/02/toggle-mod-mini-militia-v2215-unlimited.html
really http://saloona.co.il/pages/linkout/shopping.php?url=https://sihanandi.blogspot.com/2016/02/toggle-mod-mini-militia-v2215-unlimited.html
no http://sanmarcosyouthbaseball.com/Goto.asp?URL=https://sihanandi.blogspot.com/2016/02/toggle-mod-mini-militia-v2215-unlimited.html
difference http://saoderberg.cf/go.php?url=https://sihanandi.blogspot.com/2016/02/toggle-mod-mini-militia-v2215-unlimited.html
core http://saragross.free.fr/phpmv2/phpmyvisites.php?url=https://sihanandi.blogspot.com/2016/02/toggle-mod-mini-militia-v2215-unlimited.html
specification http://sarvesamachar.com/click.php?url=https://sihanandi.blogspot.com/2016/02/toggle-mod-mini-militia-v2215-unlimited.html
making http://sas.web.id/seo/webreview/redirect.php?url=https://sihanandi.blogspot.com/2016/02/toggle-mod-mini-militia-v2215-unlimited.html
this http://satire.ml/modules/mod_jw_srfr/redir.php?url=https://sihanandi.blogspot.com/2016/02/toggle-mod-mini-militia-v2215-unlimited.html
an http://sax.sina.com.cn/click?type=nonstd&t=REowMDAwNTE1OQ==&sign=567ad313a63c2da0&url=https://sihanandi.blogspot.com/2016/02/toggle-mod-mini-militia-v2215-unlimited.html
even http://sayt.birinde.az/redirect?url=https://sihanandi.blogspot.com/2016/02/toggle-mod-mini-militia-v2215-unlimited.html
better http://sc-wp.itseo.pl/test.php?url=https://sihanandi.blogspot.com/2016/02/toggle-mod-mini-militia-v2215-unlimited.html
deal http://scd.univ-poitiers.fr/servlet/com.kportal.pdf.PDFServlet?URL=https://sihanandi.blogspot.com/2016/02/toggle-mod-mini-militia-v2215-unlimited.html
you http://scholar.google.cl/scholar_share?url=https://sihanandi.blogspot.com/2016/02/toggle-mod-mini-militia-v2215-unlimited.html
can http://scholar.google.co.il/scholar_share?url=https://sihanandi.blogspot.com/2016/02/toggle-mod-mini-militia-v2215-unlimited.html
find http://scholar.google.co.th/scholar_share?url=https://sihanandi.blogspot.com/2016/02/toggle-mod-mini-militia-v2215-unlimited.html
rockbottom http://scholar.google.pt/scholar_share?url=https://sihanandi.blogspot.com/2016/02/toggle-mod-mini-militia-v2215-unlimited.html
price http://school.nssh.ntpc.edu.tw/dynaweb/netlink/hits.php?id=402&url=https://sihanandi.blogspot.com/2016/02/toggle-mod-mini-militia-v2215-unlimited.html
Global http://school40.kz/redirect.php?url=https://sihanandi.blogspot.com/2016/02/toggle-mod-mini-militia-v2215-unlimited.html
model http://schoolfield.com.ua/go.php?url=https://sihanandi.blogspot.com/2016/02/toggle-mod-mini-militia-v2215-unlimited.html
recommended http://scoop.ma/send.php?url=https://sihanandi.blogspot.com/2016/02/toggle-mod-mini-militia-v2215-unlimited.html
provided http://scope.hackbeat.org/out?url=https://sihanandi.blogspot.com/2016/02/toggle-mod-mini-militia-v2215-unlimited.html
youre http://sculib.scu.edu:4550/showres?url=https://sihanandi.blogspot.com/2016/02/toggle-mod-mini-militia-v2215-unlimited.html
happy http://scuola.italia4all.it/app/viewer/sito.php?url=https://sihanandi.blogspot.com/2016/02/toggle-mod-mini-militia-v2215-unlimited.html
get http://sd-83932.dedibox.fr/redir.php?url=https://sihanandi.blogspot.com/2016/02/toggle-mod-mini-militia-v2215-unlimited.html
along http://sd32.senate.ca.gov/sites/sd32.senate.ca.gov/files/outreach/common/sd32-mendoza-redirect.php?URL=https://sihanandi.blogspot.com/2016/02/toggle-mod-mini-militia-v2215-unlimited.html
with http://search.dgten.jp/rank.cgi?mode=link&id=470&url=https://sihanandi.blogspot.com/2016/02/toggle-mod-mini-militia-v2215-unlimited.html
MIUI http://search.imicams.ac.cn/pds?func=sso&calling_system=metalib&url=https://sihanandi.blogspot.com/2016/02/toggle-mod-mini-militia-v2215-unlimited.html
Read http://search.kobelco.co.jp/click?url=https://sihanandi.blogspot.com/2016/02/toggle-mod-mini-militia-v2215-unlimited.html
our http://search.wi.gov/cpp/cs.html?url=https://sihanandi.blogspot.com/2016/02/toggle-mod-mini-militia-v2215-unlimited.html
Xiaomi http://secure.bellonline.co.uk/refer.php?aff=254&url=https://sihanandi.blogspot.com/2016/02/toggle-mod-mini-militia-v2215-unlimited.html
Redmi http://secure.kelownachamber.org/cwt/external/wcpages/referral.aspx?ReferralType=W&ProfileID=963&ListingID=849&CategoryID=39&SubCategoryID=0&url=https://sihanandi.blogspot.com/2016/02/toggle-mod-mini-militia-v2215-unlimited.html
4A http://seefmall.com.bh/LangSwitch/switchLanguage/arabic?url=https://sihanandi.blogspot.com/2016/02/toggle-mod-mini-militia-v2215-unlimited.html
review http://senpo.jp/search/cnt.php?url=https://sihanandi.blogspot.com/2016/02/toggle-mod-mini-militia-v2215-unlimited.html
Vodafone http://sensibleendowment.com/go.php/ad/2/?url=https://sihanandi.blogspot.com/2016/02/toggle-mod-mini-militia-v2215-unlimited.html
Smart http://seo-analyse.trendstudio.it/redirect.php?url=https://sihanandi.blogspot.com/2016/02/toggle-mod-mini-militia-v2215-unlimited.html
N8 http://seo-analytic.co.il/wr/redirect.php?url=https://sihanandi.blogspot.com/2016/02/toggle-mod-mini-militia-v2215-unlimited.html
Vodafone http://seo-catalog.cba.pl/jump.php?sid=13593&url=https://sihanandi.blogspot.com/2016/02/toggle-mod-mini-militia-v2215-unlimited.html
Smart http://seo-check.to.web.tr/redirect.php?url=https://sihanandi.blogspot.com/2016/02/toggle-mod-mini-militia-v2215-unlimited.html
N8 http://seo-noob.ru/links/go.php?url=https://sihanandi.blogspot.com/2016/02/toggle-mod-mini-militia-v2215-unlimited.html
Rating http://seo-tool.victortisnado.com/redirect.php?url=https://sihanandi.blogspot.com/2016/02/toggle-mod-mini-militia-v2215-unlimited.html
ratingsratingsratingsratingsratings http://seo-webmaster-tools.cz/redirect.php?url=https://sihanandi.blogspot.com/2016/02/toggle-mod-mini-militia-v2215-unlimited.html
Reviewed http://seo.gogoshark.com/redirect.php?url=https://sihanandi.blogspot.com/2016/02/toggle-mod-mini-militia-v2215-unlimited.html
March http://seo.nocti.cn/redirect.php?url=https://sihanandi.blogspot.com/2016/02/toggle-mod-mini-militia-v2215-unlimited.html
2018 http://seo.qubem.com/redirect.php?url=https://sihanandi.blogspot.com/2016/02/toggle-mod-mini-militia-v2215-unlimited.html
you http://seo.wpfile.ir/redirect.php?url=https://sihanandi.blogspot.com/2016/02/toggle-mod-mini-militia-v2215-unlimited.html
are http://seoaudit.saytlar.az/redirect.php?url=https://sihanandi.blogspot.com/2016/02/toggle-mod-mini-militia-v2215-unlimited.html
OK http://seogratis.qtag.com.br/redirect.php?url=https://sihanandi.blogspot.com/2016/02/toggle-mod-mini-militia-v2215-unlimited.html
with http://seoker.w1c.ru/redirect.php?url=https://sihanandi.blogspot.com/2016/02/toggle-mod-mini-militia-v2215-unlimited.html
being http://seolife.in.ua/go.php?url=https://sihanandi.blogspot.com/2016/02/toggle-mod-mini-militia-v2215-unlimited.html
stuck http://seolisa.ir/redirect.php?url=https://sihanandi.blogspot.com/2016/02/toggle-mod-mini-militia-v2215-unlimited.html
Vodafone http://seoraporu.co/redirect.php?url=https://sihanandi.blogspot.com/2016/02/toggle-mod-mini-militia-v2215-unlimited.html
Smart http://sepomex.gob.mx/_layouts/redir/redir.aspx?url=https://sihanandi.blogspot.com/2016/02/toggle-mod-mini-militia-v2215-unlimited.html
N8 http://septron.de/sgifwebsitereview/redirect.php?url=https://sihanandi.blogspot.com/2016/02/toggle-mod-mini-militia-v2215-unlimited.html
pretty http://serizine.seri.org/Check.html?TV9JRD1rb2xpTXhOQk53OEs4aUlUM0ZwMW9PeVk4aWp6ZFZnb0txTXNtSW5oRE1UVTNORGcxTmc9PUxUenRQSm9LcU1VT3VvS0VqRjlmWjV6dFBJb2lFOGVZU3lyTkhCaGI3&U1RZUEU9TUFTUw==&TElTVF9UQUJMRT1FQkFEMDk2MA==&UE9TVF9JRD0yMDEzMDkwMzAwMDAx&VEM9MjAxMzA5MTA=&S0lORD1D&Q0lEPTA0Ng==&URL=https://sihanandi.blogspot.com/2016/02/toggle-mod-mini-militia-v2215-unlimited.html
much http://server1.streamsend.com/streamsend/clicktracker.php?cd=21461&ld=1&md=362&ud=56ba452fd34beb922b14e766fbdc2c86&url=https://sihanandi.blogspot.com/2016/02/toggle-mod-mini-militia-v2215-unlimited.html
least http://server1.streamsend.com/streamsend/clicktracker.php?ld=1&cd=3178&md=-1&ud=-1&url=https://sihanandi.blogspot.com/2016/02/toggle-mod-mini-militia-v2215-unlimited.html
you http://service.blackanddecker.ae/BD/AE/en-AE/LanguageSwitch/TransformURL?url=https://sihanandi.blogspot.com/2016/02/toggle-mod-mini-militia-v2215-unlimited.html
should http://service.blackanddecker.is/BD/IS/en-GB/LanguageSwitch/TransformURL?url=https://sihanandi.blogspot.com/2016/02/toggle-mod-mini-militia-v2215-unlimited.html
spend http://service.dewalt.ae/DEWALT/AE/en-AE/LanguageSwitch/TransformURL?url=https://sihanandi.blogspot.com/2016/02/toggle-mod-mini-militia-v2215-unlimited.html
functioning http://service.dewalt.md/DEWALT/MD/en-GB/LanguageSwitch/TransformURL?url=https://sihanandi.blogspot.com/2016/02/toggle-mod-mini-militia-v2215-unlimited.html
smartphone http://serw.clicksor.com/redir.php?url=https://sihanandi.blogspot.com/2016/02/toggle-mod-mini-militia-v2215-unlimited.html
You http://setofwatches.com/inc/goto.php?brand=Sarpaneva&url=https://sihanandi.blogspot.com/2016/02/toggle-mod-mini-militia-v2215-unlimited.html
wont http://sfhmmy7.sfhmmy.gr/external.php?url=https://sihanandi.blogspot.com/2016/02/toggle-mod-mini-militia-v2215-unlimited.html
see http://sfx.lib.ustc.edu.cn:8331/pds?func=sso&calling_system=metalib&url=https://sihanandi.blogspot.com/2016/02/toggle-mod-mini-militia-v2215-unlimited.html
much http://sh.sy/video/redirect?url=https://sihanandi.blogspot.com/2016/02/toggle-mod-mini-militia-v2215-unlimited.html
an http://shabik.sa/download.php?platform=bb&prd=&url=https://sihanandi.blogspot.com/2016/02/toggle-mod-mini-militia-v2215-unlimited.html
improvement http://shamra.sy/redirect?url=https://sihanandi.blogspot.com/2016/02/toggle-mod-mini-militia-v2215-unlimited.html
performance http://shenzen-4d.com/redir.php?url=https://sihanandi.blogspot.com/2016/02/toggle-mod-mini-militia-v2215-unlimited.html
unless http://shindig2.epfl.ch/gadgets/ifr?nocache=0&url=https://sihanandi.blogspot.com/2016/02/toggle-mod-mini-militia-v2215-unlimited.html
you http://shinhansekuritas.co.id/article.php?url=https://sihanandi.blogspot.com/2016/02/toggle-mod-mini-militia-v2215-unlimited.html
spend http://shithtolesa.cf/linkredir.php?url=https://sihanandi.blogspot.com/2016/02/toggle-mod-mini-militia-v2215-unlimited.html
double http://shop.peffy.in/shopnow?store=amazon.in&id=bgamazon-inbaggit-creator-bindas-womens-clutchdpb012gx9qdu-sp&url=https://sihanandi.blogspot.com/2016/02/toggle-mod-mini-militia-v2215-unlimited.html
£79 http://shopmason.net/redir.php?url=https://sihanandi.blogspot.com/2016/02/toggle-mod-mini-militia-v2215-unlimited.html
asking http://show.pp.ua/go/?url=https://sihanandi.blogspot.com/2016/02/toggle-mod-mini-militia-v2215-unlimited.html
price http://shuhovlibrary.kz/go/url=https://sihanandi.blogspot.com/2016/02/toggle-mod-mini-militia-v2215-unlimited.html
for http://sieuchemgio.wap.ug/redirect.php?url=https://sihanandi.blogspot.com/2016/02/toggle-mod-mini-militia-v2215-unlimited.html
teenagers http://sihaiba.com/wp-content/themes/begin/inc/go.php?url=https://sihanandi.blogspot.com/2016/02/toggle-mod-mini-militia-v2215-unlimited.html
or http://sil-navi.com/syuuten/click.php?f=p&v=63&u=https://sihanandi.blogspot.com/2016/02/toggle-mod-mini-militia-v2215-unlimited.html
simple http://silam.fmi.fi/thredds/view/idv.jnlp?url=https://sihanandi.blogspot.com/2016/02/toggle-mod-mini-militia-v2215-unlimited.html
internet http://sinabi.go.cr/chat/CuteSoft_Client/CuteChat/SupportRedirect.aspx?Referrer=&Url=https://sihanandi.blogspot.com/2016/02/toggle-mod-mini-militia-v2215-unlimited.html
tool http://sinokultur.ch/_lien.php?id_lien=21&url=https://sihanandi.blogspot.com/2016/02/toggle-mod-mini-militia-v2215-unlimited.html
will http://siteanalyzer.josepi.com/redirect.php?url=https://sihanandi.blogspot.com/2016/02/toggle-mod-mini-militia-v2215-unlimited.html
suffice http://sitebar.joesnookercorner.de/go.php?id=2880&url=https://sihanandi.blogspot.com/2016/02/toggle-mod-mini-militia-v2215-unlimited.html
But http://sitebar.joesnookercorner.de/go.php?id=6566&url=https://sihanandi.blogspot.com/2016/02/toggle-mod-mini-militia-v2215-unlimited.html
beyond http://sitebar.lynms.edu.hk/go.php?id=240&url=https://sihanandi.blogspot.com/2016/02/toggle-mod-mini-militia-v2215-unlimited.html
simple http://sitebar.sitebar.ch/go.php?id=983&url=https://sihanandi.blogspot.com/2016/02/toggle-mod-mini-militia-v2215-unlimited.html
apps http://sitedesk.net/redirect.php?url=https://sihanandi.blogspot.com/2016/02/toggle-mod-mini-militia-v2215-unlimited.html
like http://sitereview.seobmt.com/redirect.php?url=https://sihanandi.blogspot.com/2016/02/toggle-mod-mini-militia-v2215-unlimited.html
Facebook http://sites.mathdoc.fr/cgi-bin/linumr.py?url=https://sihanandi.blogspot.com/2016/02/toggle-mod-mini-militia-v2215-unlimited.html
and http://sites.ziyonet.uz/ru/site/go/3189?url=https://sihanandi.blogspot.com/2016/02/toggle-mod-mini-militia-v2215-unlimited.html
Instagram http://sites.ziyonet.uz/ru/site/go/3277?url=https://sihanandi.blogspot.com/2016/02/toggle-mod-mini-militia-v2215-unlimited.html
N8 http://sitiosperu.pe/redirect?url=https://sihanandi.blogspot.com/2016/02/toggle-mod-mini-militia-v2215-unlimited.html
struggles http://skidresultat.se/ref.php?id=46&url=https://sihanandi.blogspot.com/2016/02/toggle-mod-mini-militia-v2215-unlimited.html
Running http://skymountaincoffee.com/redirect.php?link=https://sihanandi.blogspot.com/2016/02/toggle-mod-mini-militia-v2215-unlimited.html
several http://sl3960.altervista.org/links/dirinc/click.php?url=https://sihanandi.blogspot.com/2016/02/toggle-mod-mini-militia-v2215-unlimited.html
apps http://slavyanskaya-kultura.ru/go/url=https://sihanandi.blogspot.com/2016/02/toggle-mod-mini-militia-v2215-unlimited.html
once http://sliders.co.nz/scale/?scale=0.272727272727&url=https://sihanandi.blogspot.com/2016/02/toggle-mod-mini-militia-v2215-unlimited.html
grinds http://slimnes.dotdesign.ro/hub.ashx?xid=3113_3476_BPUj34cQlgGZQQuwhyvn0g&url=https://sihanandi.blogspot.com/2016/02/toggle-mod-mini-militia-v2215-unlimited.html
halt http://smash.addow.be/?p=links&id=10&url=https://sihanandi.blogspot.com/2016/02/toggle-mod-mini-militia-v2215-unlimited.html
and http://smokewoman.org/go/url=https://sihanandi.blogspot.com/2016/02/toggle-mod-mini-militia-v2215-unlimited.html
any http://smtp.mystar.com.my/interx/tracker?op=click&id=995.1e0d&url=https://sihanandi.blogspot.com/2016/02/toggle-mod-mini-militia-v2215-unlimited.html
form http://snhuarena.com/tracker/index.html?t=sponsor&sponsor_id=29&url=https://sihanandi.blogspot.com/2016/02/toggle-mod-mini-militia-v2215-unlimited.html
graphical http://snip.ly/embed/twitter/?url=https://sihanandi.blogspot.com/2016/02/toggle-mod-mini-militia-v2215-unlimited.html
gaming http://snip.ly/external-lib-redirect/v2/?url=https://sihanandi.blogspot.com/2016/02/toggle-mod-mini-militia-v2215-unlimited.html
no http://snow-drop.or.tv/search/rank.cgi?mode=link&id=1140&url=https://sihanandi.blogspot.com/2016/02/toggle-mod-mini-militia-v2215-unlimited.html
But http://sobekventureholdings.com/redir.php?url=https://sihanandi.blogspot.com/2016/02/toggle-mod-mini-militia-v2215-unlimited.html
its http://soc.edurm.ru/go/url=https://sihanandi.blogspot.com/2016/02/toggle-mod-mini-militia-v2215-unlimited.html
not http://socar.fas.ge/chats/client.php?locale=ka&style=silver&url=https://sihanandi.blogspot.com/2016/02/toggle-mod-mini-militia-v2215-unlimited.html
built http://socargas.ge/chats/client.php?locale=en&style=silver&url=https://sihanandi.blogspot.com/2016/02/toggle-mod-mini-militia-v2215-unlimited.html
for http://social.dtec.web.id/sharer?url=https://sihanandi.blogspot.com/2016/02/toggle-mod-mini-militia-v2215-unlimited.html
that http://social.ebuzzing.it/rdro/85339_26430_1229440_45295_37359_390594/webmail.usfamily.net/web/services/go.php?url=https://sihanandi.blogspot.com/2016/02/toggle-mod-mini-militia-v2215-unlimited.html
and http://soclog.se/p/f.html?url=https://sihanandi.blogspot.com/2016/02/toggle-mod-mini-militia-v2215-unlimited.html
your http://soesy.org/wp-content/themes/begin5.2/inc/go.php?url=https://sihanandi.blogspot.com/2016/02/toggle-mod-mini-militia-v2215-unlimited.html
needs http://softnow.pl/redirect?url=https://sihanandi.blogspot.com/2016/02/toggle-mod-mini-militia-v2215-unlimited.html
are http://softx.pl/redirect?url=https://sihanandi.blogspot.com/2016/02/toggle-mod-mini-militia-v2215-unlimited.html
simple http://sok.helsebiblioteket.no/vivisimo/cgi-bin/query-meta?v:file=viv_FsCaZv&v:state=root|root&url=https://sihanandi.blogspot.com/2016/02/toggle-mod-mini-militia-v2215-unlimited.html
n http://sonaeindustria.pt/exitpage.php?url=https://sihanandi.blogspot.com/2016/02/toggle-mod-mini-militia-v2215-unlimited.html
N8 http://sonobelab.com/relay.cgi?relayid=nshome&url=https://sihanandi.blogspot.com/2016/02/toggle-mod-mini-militia-v2215-unlimited.html
will http://soprano.com/sc/goto.php?from=/cat/phantomjs.php&from2=-&URL=https://sihanandi.blogspot.com/2016/02/toggle-mod-mini-militia-v2215-unlimited.html
suffice http://soundtrackcollector.org/click.php?url=https://sihanandi.blogspot.com/2016/02/toggle-mod-mini-militia-v2215-unlimited.html
its http://sourcetree.kr/web_design.php?url=https://sihanandi.blogspot.com/2016/02/toggle-mod-mini-militia-v2215-unlimited.html
little http://southshorechamber.net/cwt/external/wcpages/wcdirectory/Directory.aspx?listingid=1072&profileid=3Y6S32996X5X&action=uweb&url=https://sihanandi.blogspot.com/2016/02/toggle-mod-mini-militia-v2215-unlimited.html
too http://sp.urici.csic.es/subjects/statsURICI.php?id=190&proxy=0&url=https://sihanandi.blogspot.com/2016/02/toggle-mod-mini-militia-v2215-unlimited.html
underpowered http://sp.urici.csic.es/subjects/statsURICI.php?id=248&proxy=0&url=https://sihanandi.blogspot.com/2016/02/toggle-mod-mini-militia-v2215-unlimited.html
check http://spac.appspro.co.il/site/spa-pro_1/default?url=https://sihanandi.blogspot.com/2016/02/toggle-mod-mini-militia-v2215-unlimited.html
out http://sparktime.ee/go/url=https://sihanandi.blogspot.com/2016/02/toggle-mod-mini-militia-v2215-unlimited.html
something http://spell-checker.ru/showerrors/iframe?url=https://sihanandi.blogspot.com/2016/02/toggle-mod-mini-militia-v2215-unlimited.html
higher http://spencerportjuniorbaseball.com/Goto.asp?URL=https://sihanandi.blogspot.com/2016/02/toggle-mod-mini-militia-v2215-unlimited.html
this http://spex.ru/goto/?url=https://sihanandi.blogspot.com/2016/02/toggle-mod-mini-militia-v2215-unlimited.html
chart http://sport-nutrition.in.ua/go.php?url=https://sihanandi.blogspot.com/2016/02/toggle-mod-mini-militia-v2215-unlimited.html
Read http://sportsvideo.net/splash?url=https://sihanandi.blogspot.com/2016/02/toggle-mod-mini-militia-v2215-unlimited.html
our http://spuni.is/sitebar/go.php?id=490&url=https://sihanandi.blogspot.com/2016/02/toggle-mod-mini-militia-v2215-unlimited.html
Vodafone http://src.kojet.com.tw/dyna/netlink/hits.php?id=127&url=https://sihanandi.blogspot.com/2016/02/toggle-mod-mini-militia-v2215-unlimited.html
Smart http://st.free.fr/phpmyvisites.php?url=https://sihanandi.blogspot.com/2016/02/toggle-mod-mini-militia-v2215-unlimited.html
N8 http://stabilitas.co.id/home/add_link/68?url=https://sihanandi.blogspot.com/2016/02/toggle-mod-mini-militia-v2215-unlimited.html
review http://stabilitas.co.id/home/add_link/88?url=https://sihanandi.blogspot.com/2016/02/toggle-mod-mini-militia-v2215-unlimited.html
10 http://staging.1819.is/linkto/335/1?url=https://sihanandi.blogspot.com/2016/02/toggle-mod-mini-militia-v2215-unlimited.html
Alcatel http://start.midnitemusic.ch/index.php?url=https://sihanandi.blogspot.com/2016/02/toggle-mod-mini-militia-v2215-unlimited.html
3V http://startuplinks.co/out?url=https://sihanandi.blogspot.com/2016/02/toggle-mod-mini-militia-v2215-unlimited.html
Alcatel http://statbandit.com/fet2/click.php?id=217&URL=https://sihanandi.blogspot.com/2016/02/toggle-mod-mini-militia-v2215-unlimited.html
3V http://static.daserste.de/system/moveto.jsp?id=ed08df778aa2600c84302d7be4242497&url=https://sihanandi.blogspot.com/2016/02/toggle-mod-mini-militia-v2215-unlimited.html
Rating http://stats2.immoscout24.ch/Redirect.aspx?stat_type_id=14&url=https://sihanandi.blogspot.com/2016/02/toggle-mod-mini-militia-v2215-unlimited.html
ratingsratingsratingsratingsratings http://stavrakoudis.econ.uoi.gr/stavrakoudis/related_link.php?url=https://sihanandi.blogspot.com/2016/02/toggle-mod-mini-militia-v2215-unlimited.html
Reviewed http://stihl70.ru/controllers/browser.php?url=https://sihanandi.blogspot.com/2016/02/toggle-mod-mini-militia-v2215-unlimited.html
June http://store.qol-web.jp/download/dl.php?url=https://sihanandi.blogspot.com/2016/02/toggle-mod-mini-militia-v2215-unlimited.html
2018 http://strefa-x.pl/redirector.php?url=https://sihanandi.blogspot.com/2016/02/toggle-mod-mini-militia-v2215-unlimited.html
In http://sugarengineers.co.za/links/refer.php?url=https://sihanandi.blogspot.com/2016/02/toggle-mod-mini-militia-v2215-unlimited.html
world http://suidkaapjagters.co.za/BannerProcess.aspx?ID=13108&URL=https://sihanandi.blogspot.com/2016/02/toggle-mod-mini-militia-v2215-unlimited.html
budget http://sukhoverkhov.ru/wp-content/plugins/wp-js-external-link-info/redirect.php?url=https://sihanandi.blogspot.com/2016/02/toggle-mod-mini-militia-v2215-unlimited.html
phones http://sukns2.vox.com.my/redirect.php?lang=my&url=https://sihanandi.blogspot.com/2016/02/toggle-mod-mini-militia-v2215-unlimited.html
Alcatel http://sunlovely.com.cn/wp-content/themes/begin/inc/go.php?url=https://sihanandi.blogspot.com/2016/02/toggle-mod-mini-militia-v2215-unlimited.html
3V http://sunnyliu.net/wp-content/themes/Begin%20lts/inc/go.php?url=https://sihanandi.blogspot.com/2016/02/toggle-mod-mini-militia-v2215-unlimited.html
decent http://supmad.com.au/Banners/Jump?url=https://sihanandi.blogspot.com/2016/02/toggle-mod-mini-militia-v2215-unlimited.html
enough http://support.netteller.com.cy/plugins/servlet/gadgets/ifr?container=atlassian&mid=10000&country=UK&lang=en&view=default&view-params={"writable":"false"}&st=atlassian:lnHE7J9HdGIlcspZ1X8wxi8ozdkreotzFyfJ5zWsgEMwI4xhGovXDRIcSxa+eCIhNYAOhyWoc4M8o3+Ee4SqXfdBBwKHdL/KXB3pesVyjh9+6yNIL1LANed8suPZLKK/I+bhd6GhfipC4N6fFug/duxAheDDrSPENYcF6DuWgKJfcYGTFRFQDRqjswmMwk7uQNodCOwwWGjlfIYlEyuGSuAB9B6RkFf0Kxsr9SUWRdD62Zgx23cOZ8wsLQRblwP9VNfHdj/1LVwadVG4uwYPxXa3pWM=&url=https://sihanandi.blogspot.com/2016/02/toggle-mod-mini-militia-v2215-unlimited.html
buy http://supremedeal.in/url.php?url=https://sihanandi.blogspot.com/2016/02/toggle-mod-mini-militia-v2215-unlimited.html
you http://sverigesradio.se/embed?url=https://sihanandi.blogspot.com/2016/02/toggle-mod-mini-militia-v2215-unlimited.html
go http://sverigesradio.se/sida/embed?url=https://sihanandi.blogspot.com/2016/02/toggle-mod-mini-militia-v2215-unlimited.html
for http://svetlyak.ru/redir/?url=https://sihanandi.blogspot.com/2016/02/toggle-mod-mini-militia-v2215-unlimited.html
£105 http://svoi-dengi.ru/redirekt.php?url=https://sihanandi.blogspot.com/2016/02/toggle-mod-mini-militia-v2215-unlimited.html
deal http://swisstld.ch/tldreview/redirect.php?url=https://sihanandi.blogspot.com/2016/02/toggle-mod-mini-militia-v2215-unlimited.html
Tesco http://systemeffecto.pl/redirect/7412_462080/hDwCEEcfdbedaikE?url=https://sihanandi.blogspot.com/2016/02/toggle-mod-mini-militia-v2215-unlimited.html
Mobile http://szikla.hu/redir?url=https://sihanandi.blogspot.com/2016/02/toggle-mod-mini-militia-v2215-unlimited.html
Youll http://t.ants.vn/a1/c/?bc=af837a70c7,l1486771201959,1486882192,v,1,568743473,568730659,568732269,31648,1,583125423,583125416,5,0_1&t_s=568743473-583125423-568732269:1&t_z=&t_tp=&t_itr=&t_imk=&t_rm=&c_tp=31647:1&c_itr=-1:-1&c_imk=-1:-1&c_rm=&redirect=https://sihanandi.blogspot.com/2016/02/toggle-mod-mini-militia-v2215-unlimited.html
need http://t.umblr.com/redirect?z=https://sihanandi.blogspot.com/2016/02/toggle-mod-mini-militia-v2215-unlimited.html
be http://tags.dbmetrics.com.au/?url=https://sihanandi.blogspot.com/2016/02/toggle-mod-mini-militia-v2215-unlimited.html
ok http://takeoverrust.com/redir.php?url=https://sihanandi.blogspot.com/2016/02/toggle-mod-mini-militia-v2215-unlimited.html
with http://talad-pra.com/goto.php?url=https://sihanandi.blogspot.com/2016/02/toggle-mod-mini-militia-v2215-unlimited.html
some http://tao.china-ef.com/goto.aspx?url=https://sihanandi.blogspot.com/2016/02/toggle-mod-mini-militia-v2215-unlimited.html
laggy http://tao.ndbc.noaa.gov/taoexit.php?url=https://sihanandi.blogspot.com/2016/02/toggle-mod-mini-militia-v2215-unlimited.html
performance http://tarelkatv.zp.ua/go/url=https://sihanandi.blogspot.com/2016/02/toggle-mod-mini-militia-v2215-unlimited.html
and http://tarhche.ir/goBaby/?url=https://sihanandi.blogspot.com/2016/02/toggle-mod-mini-militia-v2215-unlimited.html
unreliable http://taste.reenta.jp/data/linklog.php?url=https://sihanandi.blogspot.com/2016/02/toggle-mod-mini-militia-v2215-unlimited.html
cameras http://tatar-congress.org/redir.php?url=https://sihanandi.blogspot.com/2016/02/toggle-mod-mini-militia-v2215-unlimited.html
You http://tattooremovalnearmehq.com/wp-content/nearme-lib/goto.php?id=425&url=https://sihanandi.blogspot.com/2016/02/toggle-mod-mini-militia-v2215-unlimited.html
do http://tauhbes.cf/tools/hp/?uid=0000002225&url=https://sihanandi.blogspot.com/2016/02/toggle-mod-mini-militia-v2215-unlimited.html
get http://teacher.in.ua/go/url=https://sihanandi.blogspot.com/2016/02/toggle-mod-mini-militia-v2215-unlimited.html
some http://teacher.sjps.ptc.edu.tw/sjpsweb/online_tool/dyna/netlink/hits.php?id=239&url=https://sihanandi.blogspot.com/2016/02/toggle-mod-mini-militia-v2215-unlimited.html
reasonable http://teatro.persinsala.it/stats/link_logger.php?url=https://sihanandi.blogspot.com/2016/02/toggle-mod-mini-militia-v2215-unlimited.html
specs http://techdoc.netsoftlab.ca/hcount.php?url=https://sihanandi.blogspot.com/2016/02/toggle-mod-mini-militia-v2215-unlimited.html
though http://technoside.com.ua/index.php?page=social_send&social=20&url=https://sihanandi.blogspot.com/2016/02/toggle-mod-mini-militia-v2215-unlimited.html
including http://tegels.nl/fabrikant_redirect.asp?fabrikant_id=6401&via_organisatie_id=62&URL=https://sihanandi.blogspot.com/2016/02/toggle-mod-mini-militia-v2215-unlimited.html
decent http://tehnoshell.ru/go.php?url=https://sihanandi.blogspot.com/2016/02/toggle-mod-mini-militia-v2215-unlimited.html
18 http://telefonshop.az/go/url=https://sihanandi.blogspot.com/2016/02/toggle-mod-mini-militia-v2215-unlimited.html
screen http://tepliydom.kz/go/url=https://sihanandi.blogspot.com/2016/02/toggle-mod-mini-militia-v2215-unlimited.html
and http://terredivirgilio.it/redirect.asp?url=https://sihanandi.blogspot.com/2016/02/toggle-mod-mini-militia-v2215-unlimited.html
fingerprint http://test-www2.bbf.be/de/site/banner?url=https://sihanandi.blogspot.com/2016/02/toggle-mod-mini-militia-v2215-unlimited.html
scanner http://test.ddc.moph.go.th/all/showimgurl.php?id=102&url=https://sihanandi.blogspot.com/2016/02/toggle-mod-mini-militia-v2215-unlimited.html
youre http://test1.designwebstudio.com.ua/go/url=https://sihanandi.blogspot.com/2016/02/toggle-mod-mini-militia-v2215-unlimited.html
budget http://tevdev.adventgx.com/redirect.asp?url=https://sihanandi.blogspot.com/2016/02/toggle-mod-mini-militia-v2215-unlimited.html
can http://texte.mediaevum.de/cgi-bin/click.php?id=mlat_15&url=https://sihanandi.blogspot.com/2016/02/toggle-mod-mini-militia-v2215-unlimited.html
stretch http://tfea-en.tfea.org.tw/front/bin/adsclick.phtml?Nbr=afa&URL=https://sihanandi.blogspot.com/2016/02/toggle-mod-mini-militia-v2215-unlimited.html
though http://thebest.com.qa/web/wp-content/themes/rttheme19/js/lightbox/modules/jackbox_social.php?url=https://sihanandi.blogspot.com/2016/02/toggle-mod-mini-militia-v2215-unlimited.html
spend http://thehallows.co.uk/redir.php?url=https://sihanandi.blogspot.com/2016/02/toggle-mod-mini-militia-v2215-unlimited.html
little http://themes.smarttechcorp.vn/?url=https://sihanandi.blogspot.com/2016/02/toggle-mod-mini-militia-v2215-unlimited.html
more http://thewoodsmen.com.au/analytics/outbound?url=https://sihanandi.blogspot.com/2016/02/toggle-mod-mini-militia-v2215-unlimited.html
and http://thisoldcode.net/ct.ashx?id=1b4d44c9-dfaa-46ca-b1fd-fffbf69a0124&url=https://sihanandi.blogspot.com/2016/02/toggle-mod-mini-militia-v2215-unlimited.html
get http://thompson-travel.com/Redirect.aspx?url=https://sihanandi.blogspot.com/2016/02/toggle-mod-mini-militia-v2215-unlimited.html
Moto http://thucphamnhapkhau.vn/redirect?url=https://sihanandi.blogspot.com/2016/02/toggle-mod-mini-militia-v2215-unlimited.html
G6 http://thuisforum.be/youtube.php?url=https://sihanandi.blogspot.com/2016/02/toggle-mod-mini-militia-v2215-unlimited.html
Play http://thunk.coffeecode.ca/service/web/urlproxy/?url=https://sihanandi.blogspot.com/2016/02/toggle-mod-mini-militia-v2215-unlimited.html
Read http://thymemedia.co.uk/redir.php?url=https://sihanandi.blogspot.com/2016/02/toggle-mod-mini-militia-v2215-unlimited.html
our http://tillkaffet.se/intranet/item.asp?url=https://sihanandi.blogspot.com/2016/02/toggle-mod-mini-militia-v2215-unlimited.html
Alcatel http://tilzit.org/white/goto.php?site=https://sihanandi.blogspot.com/2016/02/toggle-mod-mini-militia-v2215-unlimited.html
3V http://tim.mackey.ie/ct.ashx?id=b9184d35-b02d-4ffb-a363-7a0743263e4a&url=https://sihanandi.blogspot.com/2016/02/toggle-mod-mini-militia-v2215-unlimited.html
review http://times.tj/redirect?url=https://sihanandi.blogspot.com/2016/02/toggle-mod-mini-militia-v2215-unlimited.html
Tags http://tinchi.qui.edu.vn/cmcsoft.iu.web.info/Login.aspx?url=https://sihanandi.blogspot.com/2016/02/toggle-mod-mini-militia-v2215-unlimited.html
Smartphones http://tinmoinhan.net/w?url=https://sihanandi.blogspot.com/2016/02/toggle-mod-mini-militia-v2215-unlimited.html
Gadgets http://tissi.fi/go.php?url=https://sihanandi.blogspot.com/2016/02/toggle-mod-mini-militia-v2215-unlimited.html
Android http://tivdome.ru/go/url=https://sihanandi.blogspot.com/2016/02/toggle-mod-mini-militia-v2215-unlimited.html
Windows http://tms.csj.ks.edu.tw/school/imglink/hits.php?id=77&url=https://sihanandi.blogspot.com/2016/02/toggle-mod-mini-militia-v2215-unlimited.html
The http://to.ht/?format=simple&action=shorturl&url=https://sihanandi.blogspot.com/2016/02/toggle-mod-mini-militia-v2215-unlimited.html
best http://today.kiev.ua/redirect.php?url=https://sihanandi.blogspot.com/2016/02/toggle-mod-mini-militia-v2215-unlimited.html
midrange http://today.od.ua/redirect.php?url=https://sihanandi.blogspot.com/2016/02/toggle-mod-mini-militia-v2215-unlimited.html
phones http://todoclasico.cl/todoclasico/redirect.asp@idl=12&url=https://sihanandi.blogspot.com/2016/02/toggle-mod-mini-militia-v2215-unlimited.html
for http://tomcare.vn/details_qa/0/nvxbwj
2018 http://tongji.cnki.net/overseas/&url=https://sihanandi.blogspot.com/2016/02/toggle-mod-mini-militia-v2215-unlimited.html
Your http://tont.ee/scount/?url=https://sihanandi.blogspot.com/2016/02/toggle-mod-mini-militia-v2215-unlimited.html
guide http://toolsoft.uy/cronjobs/videoBBC.php?url=https://sihanandi.blogspot.com/2016/02/toggle-mod-mini-militia-v2215-unlimited.html
to http://tor.kz/go/url=https://sihanandi.blogspot.com/2016/02/toggle-mod-mini-militia-v2215-unlimited.html
the http://torontino.ca/redirect?url=https://sihanandi.blogspot.com/2016/02/toggle-mod-mini-militia-v2215-unlimited.html
latest http://torrent.janemusic.org/redir.php?url=https://sihanandi.blogspot.com/2016/02/toggle-mod-mini-militia-v2215-unlimited.html
and http://torrents-club.org/go.php?url=https://sihanandi.blogspot.com/2016/02/toggle-mod-mini-militia-v2215-unlimited.html
best http://totul.md/ro/finances/redirect/?url=https://sihanandi.blogspot.com/2016/02/toggle-mod-mini-militia-v2215-unlimited.html
midrange http://toukoucity.to/adclick.php?url=https://sihanandi.blogspot.com/2016/02/toggle-mod-mini-militia-v2215-unlimited.html
smartphones http://toulousetri.free.fr/redirect.php?url=https://sihanandi.blogspot.com/2016/02/toggle-mod-mini-militia-v2215-unlimited.html
of http://tourspel.daspublishers.nl/clicks.php?url=https://sihanandi.blogspot.com/2016/02/toggle-mod-mini-militia-v2215-unlimited.html
2018 http://trac.calamel.jp/redirect?aid=MS00334401&url=https://sihanandi.blogspot.com/2016/02/toggle-mod-mini-militia-v2215-unlimited.html
Check http://track.sendpal.in/link/track/5426307d0cf2d49931c64ee5/mail/5426307d0cf2d49931c64ee1/feature?url=https://sihanandi.blogspot.com/2016/02/toggle-mod-mini-militia-v2215-unlimited.html
out http://track.sendpal.in/link/track/54d4544e0cf21232b88b6c0b/mail/54d4544e0cf21232b88b6bf4/feature?url=https://sihanandi.blogspot.com/2016/02/toggle-mod-mini-militia-v2215-unlimited.html
our http://tracker.keymedia.com.au/?id=7820&url=https://sihanandi.blogspot.com/2016/02/toggle-mod-mini-militia-v2215-unlimited.html
reviews http://tracker.sampo.ru/redir.php?url=https://sihanandi.blogspot.com/2016/02/toggle-mod-mini-militia-v2215-unlimited.html
and http://traderulebook.ekon.go.id/rulebook/id?url=https://sihanandi.blogspot.com/2016/02/toggle-mod-mini-militia-v2215-unlimited.html
buyer http://transitoaberto.com.br/redirect.asp?url=https://sihanandi.blogspot.com/2016/02/toggle-mod-mini-militia-v2215-unlimited.html
guide http://trasverige.se/external-counter?url=https://sihanandi.blogspot.com/2016/02/toggle-mod-mini-militia-v2215-unlimited.html
on http://trendbet11.com/redir.php?url=https://sihanandi.blogspot.com/2016/02/toggle-mod-mini-militia-v2215-unlimited.html
the http://trendclub.ru/redirect?url=https://sihanandi.blogspot.com/2016/02/toggle-mod-mini-militia-v2215-unlimited.html
top http://tress.is/index.php?url=https://sihanandi.blogspot.com/2016/02/toggle-mod-mini-militia-v2215-unlimited.html
phones http://tromsoby.no/portal.php?url=https://sihanandi.blogspot.com/2016/02/toggle-mod-mini-militia-v2215-unlimited.html
under http://truemetal.org/wolfcry/gb/go.php?url=https://sihanandi.blogspot.com/2016/02/toggle-mod-mini-militia-v2215-unlimited.html
£500 http://truetorrents.org/go.php?url=https://sihanandi.blogspot.com/2016/02/toggle-mod-mini-militia-v2215-unlimited.html
for http://truraed.co.uk/redir.php?url=https://sihanandi.blogspot.com/2016/02/toggle-mod-mini-militia-v2215-unlimited.html
this http://tunicom.com.tn/lang/chglang.asp?lang=en&url=https://sihanandi.blogspot.com/2016/02/toggle-mod-mini-militia-v2215-unlimited.html
year http://tvz.com.mx/solo_un_click.php?url=https://sihanandi.blogspot.com/2016/02/toggle-mod-mini-militia-v2215-unlimited.html
By http://txt.klikivabrik.ee/click.php?id=AEPSS&url=https://sihanandi.blogspot.com/2016/02/toggle-mod-mini-militia-v2215-unlimited.html
Chris http://u.55188.com/link.php?url=https://sihanandi.blogspot.com/2016/02/toggle-mod-mini-militia-v2215-unlimited.html
Martin http://u.riju.com/goto.php?url=https://sihanandi.blogspot.com/2016/02/toggle-mod-mini-militia-v2215-unlimited.html
25 http://ubs-hainer.com/wp-content/plugins/wp-js-external-link-info/redirect.php?blog=UBS+Hainer&url=https://sihanandi.blogspot.com/2016/02/toggle-mod-mini-militia-v2215-unlimited.html
Jul http://ukadd.com/click.php?id=1a947c82f38465a8330d25382cb0554e&ffaid=b02e0fd75723f96b9da25d7df887690b&url=https://sihanandi.blogspot.com/2016/02/toggle-mod-mini-militia-v2215-unlimited.html
2018 http://ukmfh.org.uk/redirect.php?id=2258&url=https://sihanandi.blogspot.com/2016/02/toggle-mod-mini-militia-v2215-unlimited.html
What http://ukrface.com.ua/away.php?url=https://sihanandi.blogspot.com/2016/02/toggle-mod-mini-militia-v2215-unlimited.html
the http://umigame.bz/cgi-bin/sm/out.cgi?id=toko19oo&url=https://sihanandi.blogspot.com/2016/02/toggle-mod-mini-militia-v2215-unlimited.html
best http://umpda.um.edu.my/groupmail/services/go.php?url=https://sihanandi.blogspot.com/2016/02/toggle-mod-mini-militia-v2215-unlimited.html
midrange http://underground.co.za/redirect/?url=https://sihanandi.blogspot.com/2016/02/toggle-mod-mini-militia-v2215-unlimited.html
phone http://underthesea.lincl.kr/m/share/connection?url=https://sihanandi.blogspot.com/2016/02/toggle-mod-mini-militia-v2215-unlimited.html
you http://uniabroad.ir/go/?url=https://sihanandi.blogspot.com/2016/02/toggle-mod-mini-militia-v2215-unlimited.html
can http://uniform.wingzero.tw/school/redirect?url=https://sihanandi.blogspot.com/2016/02/toggle-mod-mini-militia-v2215-unlimited.html
buy? http://unknown.serveftp.com/portail/1-formatik/upload/goto.php?ID=a67fd821b3a2e9c3f01a8b0bbac628dc1386083280&URL=https://sihanandi.blogspot.com/2016/02/toggle-mod-mini-militia-v2215-unlimited.html
Not http://unregistration.univ-ndere.cm/index.php/auth.html?url=https://sihanandi.blogspot.com/2016/02/toggle-mod-mini-militia-v2215-unlimited.html
everyone http://usa-papa.ru/artkey.php?url=https://sihanandi.blogspot.com/2016/02/toggle-mod-mini-militia-v2215-unlimited.html
can http://user.pjtime.com.cn/goto.html?url=https://sihanandi.blogspot.com/2016/02/toggle-mod-mini-militia-v2215-unlimited.html
afford http://users.monash.edu/~davids/cgi-bin/PublicationRedirector.cgi?URL=https://sihanandi.blogspot.com/2016/02/toggle-mod-mini-militia-v2215-unlimited.html
flagship http://users.skynet.be/jeugdkoor.erpe/go.html?url=https://sihanandi.blogspot.com/2016/02/toggle-mod-mini-militia-v2215-unlimited.html
phone http://usinacgesa.cf/tracking_resa.php?url=https://sihanandi.blogspot.com/2016/02/toggle-mod-mini-militia-v2215-unlimited.html
like http://usporn.tv/st/st.php?cat=321687&x=f953e228a5ab892454d152763155f6ee&url=https://sihanandi.blogspot.com/2016/02/toggle-mod-mini-militia-v2215-unlimited.html
the http://ustarcashreviews.com/redir.php?url=https://sihanandi.blogspot.com/2016/02/toggle-mod-mini-militia-v2215-unlimited.html
Galaxy http://ustfccca.site-ym.com/link.asp?e=kyle@ustfccca.org&job=1514295&ymlink=2712401&finalurl=https://sihanandi.blogspot.com/2016/02/toggle-mod-mini-militia-v2215-unlimited.html
S http://uztor.ru/go.php?url=https://sihanandi.blogspot.com/2016/02/toggle-mod-mini-militia-v2215-unlimited.html
or http://v-kiselev.ru/go/url=https://sihanandi.blogspot.com/2016/02/toggle-mod-mini-militia-v2215-unlimited.html
iPhone http://valaholeuropaban.uw.hu/guestbook/go.php?url=https://sihanandi.blogspot.com/2016/02/toggle-mod-mini-militia-v2215-unlimited.html
X http://valk.kinderdijk.vakantieland.nl/klikuit.asp?id=-843876460&url=https://sihanandi.blogspot.com/2016/02/toggle-mod-mini-militia-v2215-unlimited.html
but http://valleyevents.ca/click?type=ad&id=149&url=https://sihanandi.blogspot.com/2016/02/toggle-mod-mini-militia-v2215-unlimited.html
the http://valleysportsreport.net/linktracker.php?url=https://sihanandi.blogspot.com/2016/02/toggle-mod-mini-militia-v2215-unlimited.html
good http://valordelweb.com/sitesreviews/redirect.php?url=https://sihanandi.blogspot.com/2016/02/toggle-mod-mini-militia-v2215-unlimited.html
news http://vaninissa.cf/redir_links2.php?l_id=25&url=https://sihanandi.blogspot.com/2016/02/toggle-mod-mini-militia-v2215-unlimited.html
that http://vaultofthoughts.net/ct.ashx?id=d24379b4-4134-4f08-bf94-2b2331bbd2ed&url=https://sihanandi.blogspot.com/2016/02/toggle-mod-mini-militia-v2215-unlimited.html
plenty http://vernisaj.md/set_sizes.php?sizes=&brand=&catalog=&item=&url=https://sihanandi.blogspot.com/2016/02/toggle-mod-mini-militia-v2215-unlimited.html
of http://vetcomunicaciones.com.ar/bloques/bannerclick.php?id=1&url=https://sihanandi.blogspot.com/2016/02/toggle-mod-mini-militia-v2215-unlimited.html
cheaper http://vibra.fastcommand.com/goto.php?url=https://sihanandi.blogspot.com/2016/02/toggle-mod-mini-militia-v2215-unlimited.html
devices http://vico.vn/redirect?url=https://sihanandi.blogspot.com/2016/02/toggle-mod-mini-militia-v2215-unlimited.html
offer http://videos.sapo.pt/oembed?url=https://sihanandi.blogspot.com/2016/02/toggle-mod-mini-militia-v2215-unlimited.html
an http://vidoz.net/go/?url=https://sihanandi.blogspot.com/2016/02/toggle-mod-mini-militia-v2215-unlimited.html
excellent http://view-homepage.com/redirect.php?url=https://sihanandi.blogspot.com/2016/02/toggle-mod-mini-militia-v2215-unlimited.html
experience http://villfageinns.cf/Click.aspx?Type=1&Guid=b0ff1376-d432-494d-9c6a-329dc2c2f1b6&url=https://sihanandi.blogspot.com/2016/02/toggle-mod-mini-militia-v2215-unlimited.html
Some http://vinris.com.ua/seo-analys/redirect.php?url=https://sihanandi.blogspot.com/2016/02/toggle-mod-mini-militia-v2215-unlimited.html
are http://vip.cengfan88.com/goto.php?url=https://sihanandi.blogspot.com/2016/02/toggle-mod-mini-militia-v2215-unlimited.html
half http://virtual.unachi.ac.pa/moodle/theme/switchdevice.php?url=https://sihanandi.blogspot.com/2016/02/toggle-mod-mini-militia-v2215-unlimited.html
the http://visita-en.aws.costadelsolmalaga.es/before-travelling/travel-around-malaga/vehicle-rental/rios-buses-p26161?cpg=1644&url=https://sihanandi.blogspot.com/2016/02/toggle-mod-mini-militia-v2215-unlimited.html
Till Now We are Only Playing With Setting And Tools For http://katieandmaxtron.blogspot.com /" target="_blank">Android
To Read How To Develop Your First Android Application Read It From Here
Tidak ada komentar:
Posting Komentar